Easy Crochet Baby Booties in Four Sizes: A Round-by-Round Guide
Crochet an oval sole in three rounds of half double crochet, turn the sides up with one back-loop round, shape the toe over five rounds, then work the ankle straight and finish with a single crochet edge. One set of instructions makes four sizes, from newborn to 12 months, by changing only the starting chain and the hook. Each pair takes a little DK yarn in two colours and a 3.5 to 4.5 mm hook. This guide follows Craft & Crochet’s video below and writes out every round for every size.
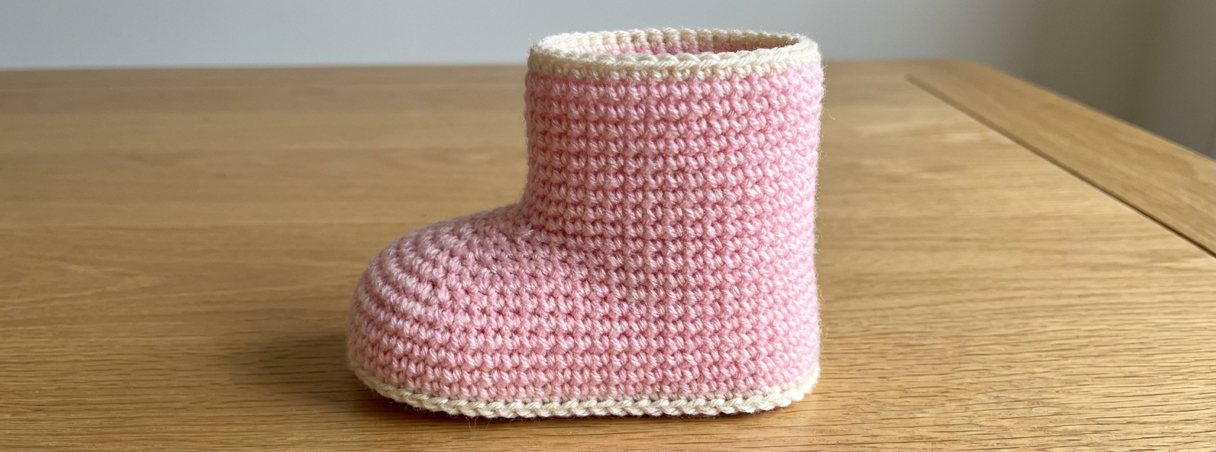
Download the free printable PDF: every round for all four sizes with a picture for every step, ready to print. No sign-up.
We have not made these booties ourselves yet. The steps and counts follow the video.
Watch the tutorial
The video is 50 minutes long because it counts every stitch out loud. Use the timestamp beside each step to jump to it.
The booties at a glance
| What | These booties |
|---|---|
| Sizes | Newborn, 0–3 months, 3–6 months, 6–12 months |
| Yarn | DK (light worsted) weight, two colours, about 20 m (22 yd) |
| Hook | 3.5 mm, 4 mm or 4.5 mm, depending on size |
| Stitches | Chain, half double crochet, half double crochet two together, single crochet, slip stitch |
| Construction | Oval sole in 3 rounds, 1 back-loop round to turn up the sides, 5 rounds shaping the toe, 5 straight rounds for the ankle, 1 round of single crochet |
| Skill level | Beginner who can work half double crochet, increase and decrease. The video calls them easy enough for beginners |
Pick your size
The design comes in two widths. A 9-chain start makes the newborn and 0–3 month sizes, and a 10-chain start makes the 3–6 and 6–12 month sizes. The hook decides the size within each pair.
| Size | Hook | Chain | Round 1 | Round 2 | Round 3 | Ankle (rounds 9 to 15) |
|---|---|---|---|---|---|---|
| Newborn | 3.5 mm | 9 | 24 | 36 | 48 | 26 |
| 0–3 months | 4 mm | 9 | 24 | 36 | 48 | 26 |
| 3–6 months | 4 mm | 10 | 26 | 38 | 50 | 28 |
| 6–12 months | 4.5 mm | 10 | 26 | 38 | 50 | 28 |
The steps give the 9-chain count first and the 10-chain count in brackets, for example [24 (26) sts]. Where there is only one number, it is the same for all four sizes.
What you need
Every tool our patterns use is on the Crochet essentials page, including yarn needles and locking stitch markers.
- DK (double knitting) yarn in two colours: the video’s yarn gives 330 m per 100 g. The video says the booties take around 20 m (22 yd) but not whether that is one bootie or the pair, so have about 40 m (44 yd) of the main colour and 20 m of the second. Choose a machine-washable yarn, because booties get washed often.
- One crochet hook in the size for your bootie: 3.5 mm, 4 mm or 4.5 mm. The hook size chart gives the US letters.
- 2 or 3 stitch markers, or short lengths of contrast yarn as the video uses.
- A blunt yarn needle for weaving in the ends.
- Scissors.
Abbreviations and the one confusing phrase
US terms throughout.
- ch: chain. The chain 1 at the start of each round does not count as a stitch.
- hdc: half double crochet.
- inc: 2 hdc in the same stitch.
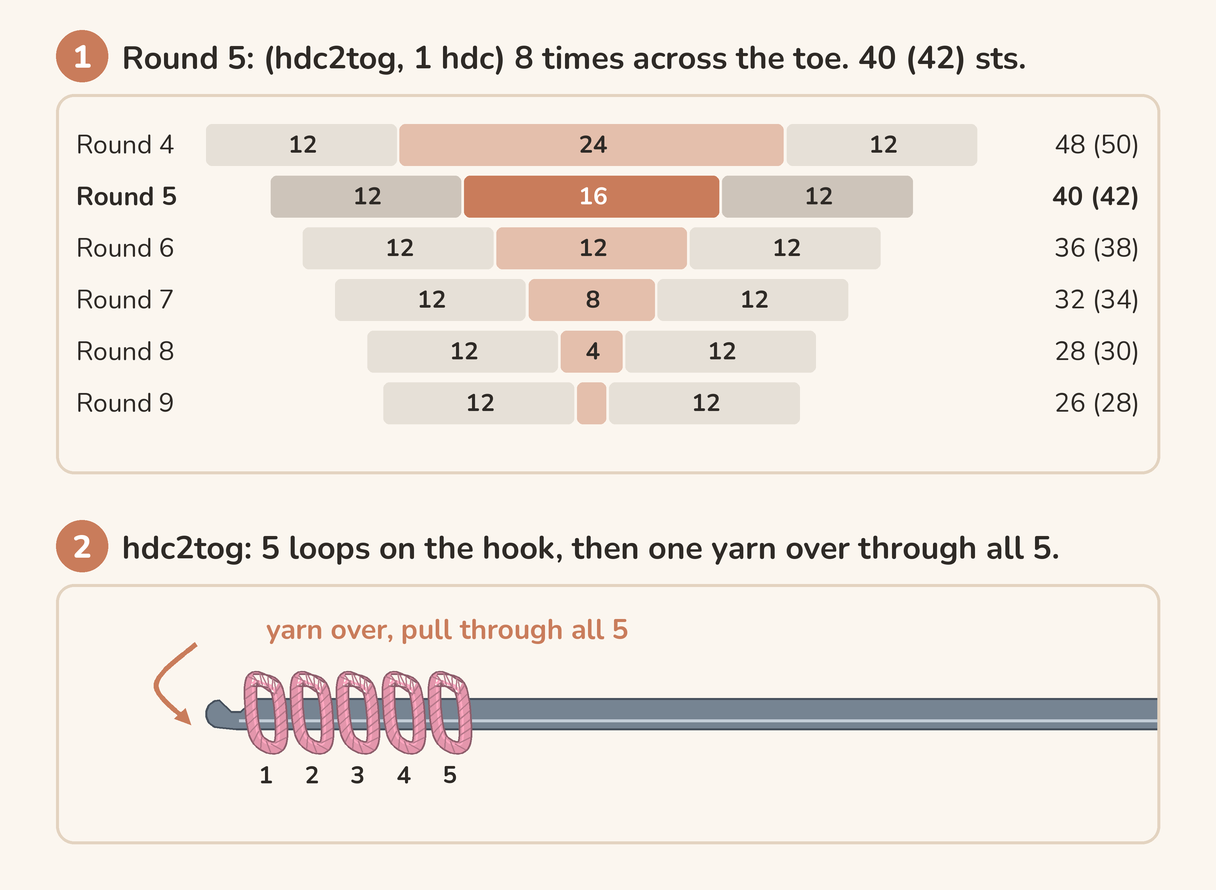
- hdc2tog: half double crochet two together, a decrease. Yarn over, insert the hook in the next stitch and pull up a loop (3 loops on the hook), yarn over, insert in the following stitch and pull up a loop (5 loops), then yarn over and pull through all 5.
- BLO: back loop only, the loop farther from you.
- sc: single crochet.
- sl st: slip stitch. Each round joins with a sl st into the first hdc.
In the video, “two half double crochet together” means two different things. In rounds 2 and 3 it means two hdc worked into one stitch, an increase. From round 5 on it means hdc2tog, a decrease. This guide writes “inc” and “hdc2tog” so the two never mix. Make the decreases firm: the video says a tight stitch gives the neatest toe.
The pattern
Work in joined rounds. Start each round with ch 1, work the first stitch into the same stitch as the join, and end with a sl st into the first hdc. The sample in the video uses cream for the sole and the edge and pink for the rest. One colour throughout works too.
The sole (colour A)
1. Make the foundation chain
Video: 3:47–4:45
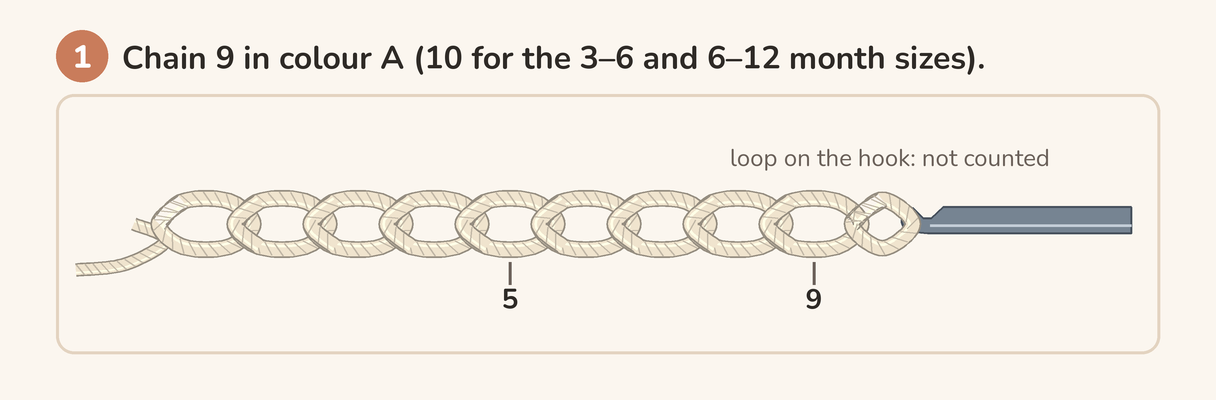
With colour A, make a slip knot and chain 9 (10).
2. Round 1: an oval round the chain
Video: 4:45–7:47
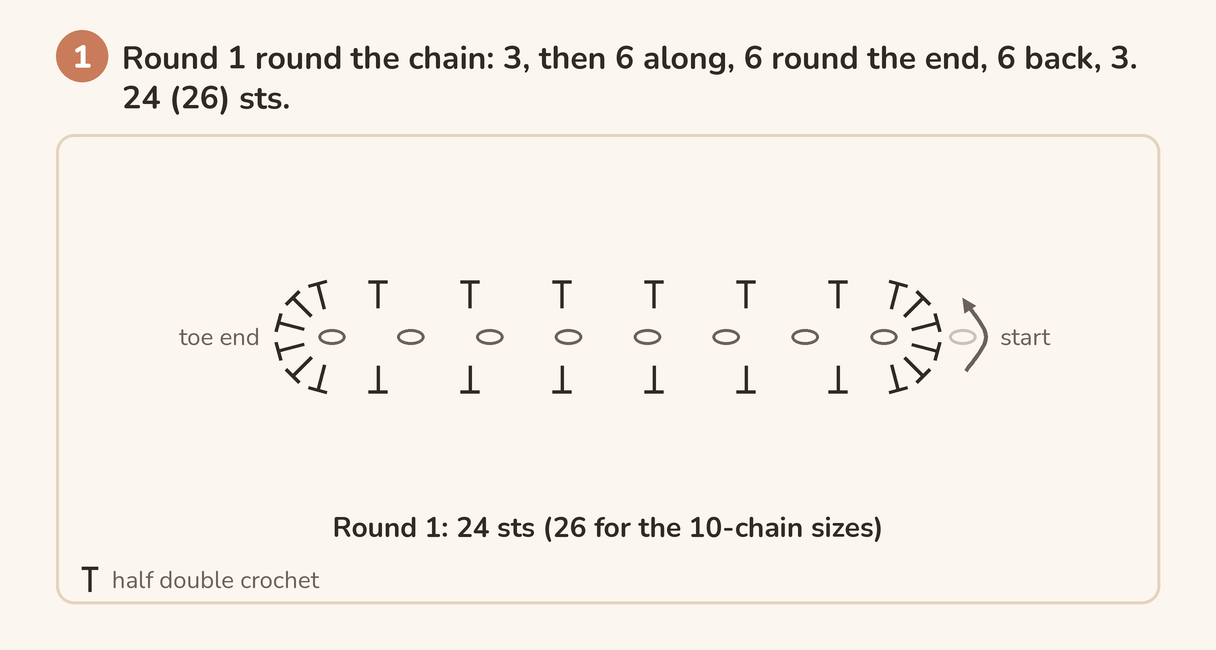
Skip the chain next to the hook. Work 3 hdc into the 2nd chain from the hook, then 1 hdc into each of the next 6 (7) chains. Work 6 hdc into the last chain to turn round the end. Working along the other side of the chain, work 1 hdc into each of the next 6 (7) chains, then 3 more hdc into the first chain, which already holds 3. Join with a sl st. [24 (26) sts]
3. Round 2: twelve increases
Video: 7:47–11:18
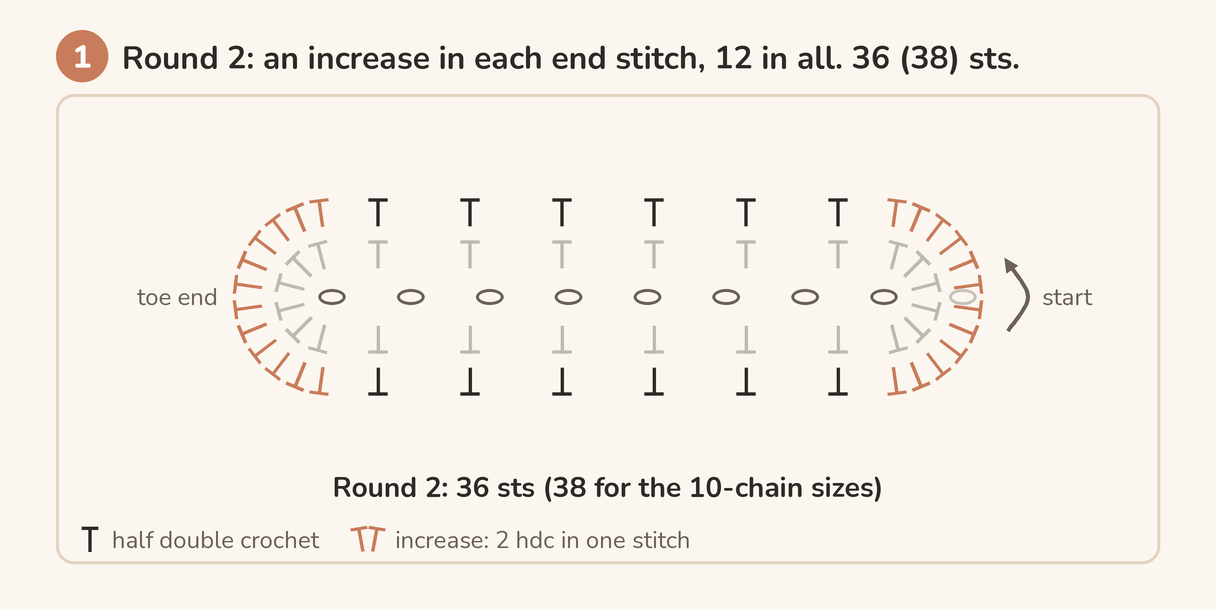
Ch 1. Inc in each of the next 3 stitches, 1 hdc in each of the next 6 (7), inc in each of the next 6, 1 hdc in each of the next 6 (7), inc in each of the last 3. Join. [36 (38) sts]
4. Round 3: twelve more increases, then check the sole
Video: 11:18–15:40
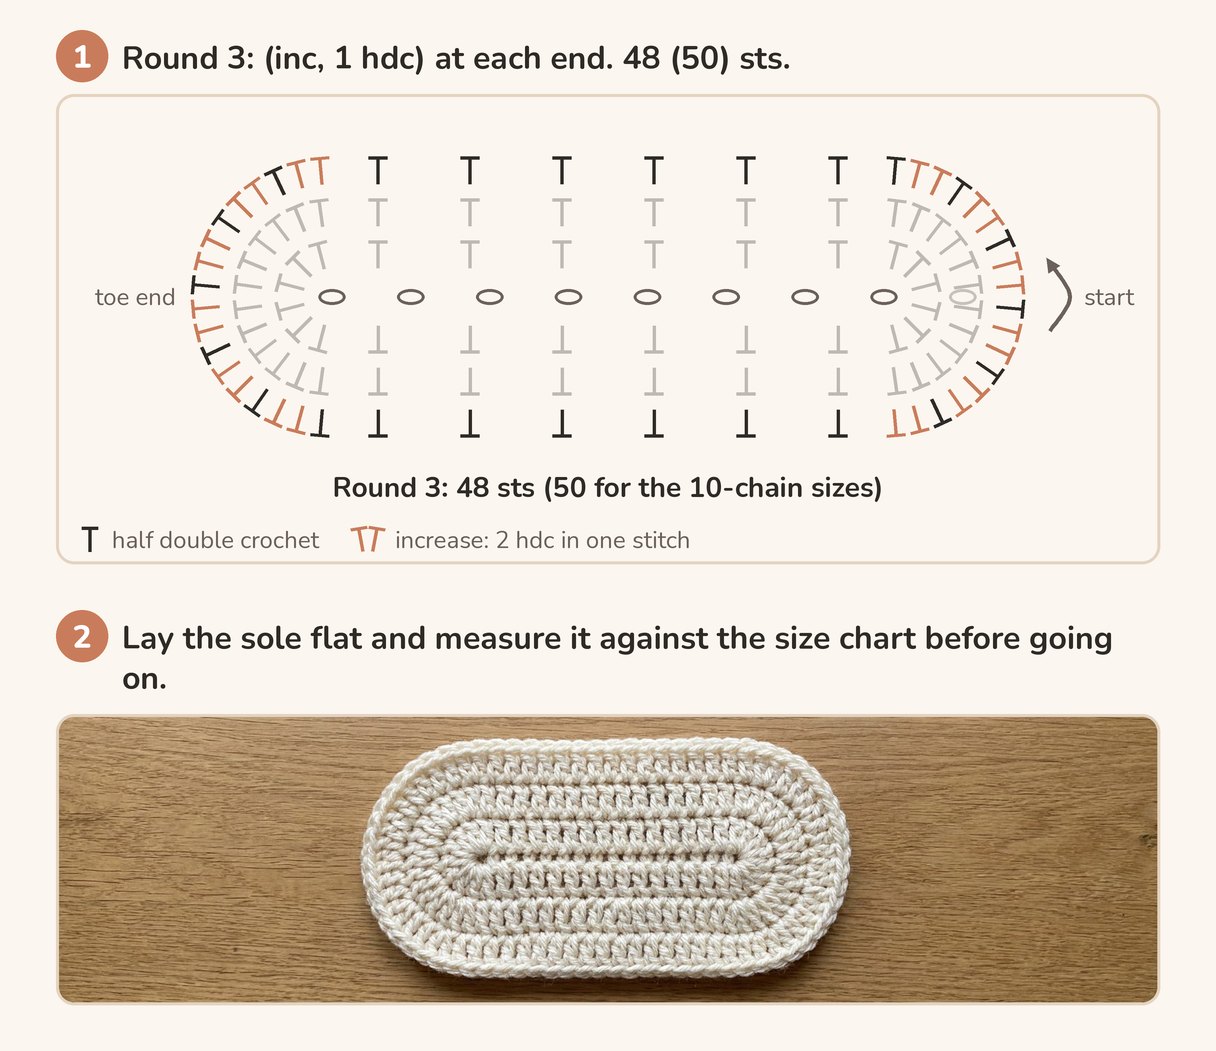
Ch 1. Work (inc, 1 hdc) 3 times, 1 hdc in each of the next 6 (7), (inc, 1 hdc) 6 times, 1 hdc in each of the next 6 (7), (inc, 1 hdc) 3 times. Join with a sl st, but finish the sl st with colour B as in step 5. [48 (50) sts]
The sole is now finished. The video gives no measurements, so lay it flat and measure it from heel to toe. Our bootie size chart puts a newborn sole at 7.5–9 cm (3–3½ in), 0–3 months at about 9 cm (3½ in), 3–6 months at about 10 cm (4 in) and 6–12 months at 11–11.5 cm (4¼–4½ in). If yours is well off, change the hook size and start again.
The sides and the toe (colour B)
5. Round 4: change colour and turn up the sides
Video: 15:40–21:46
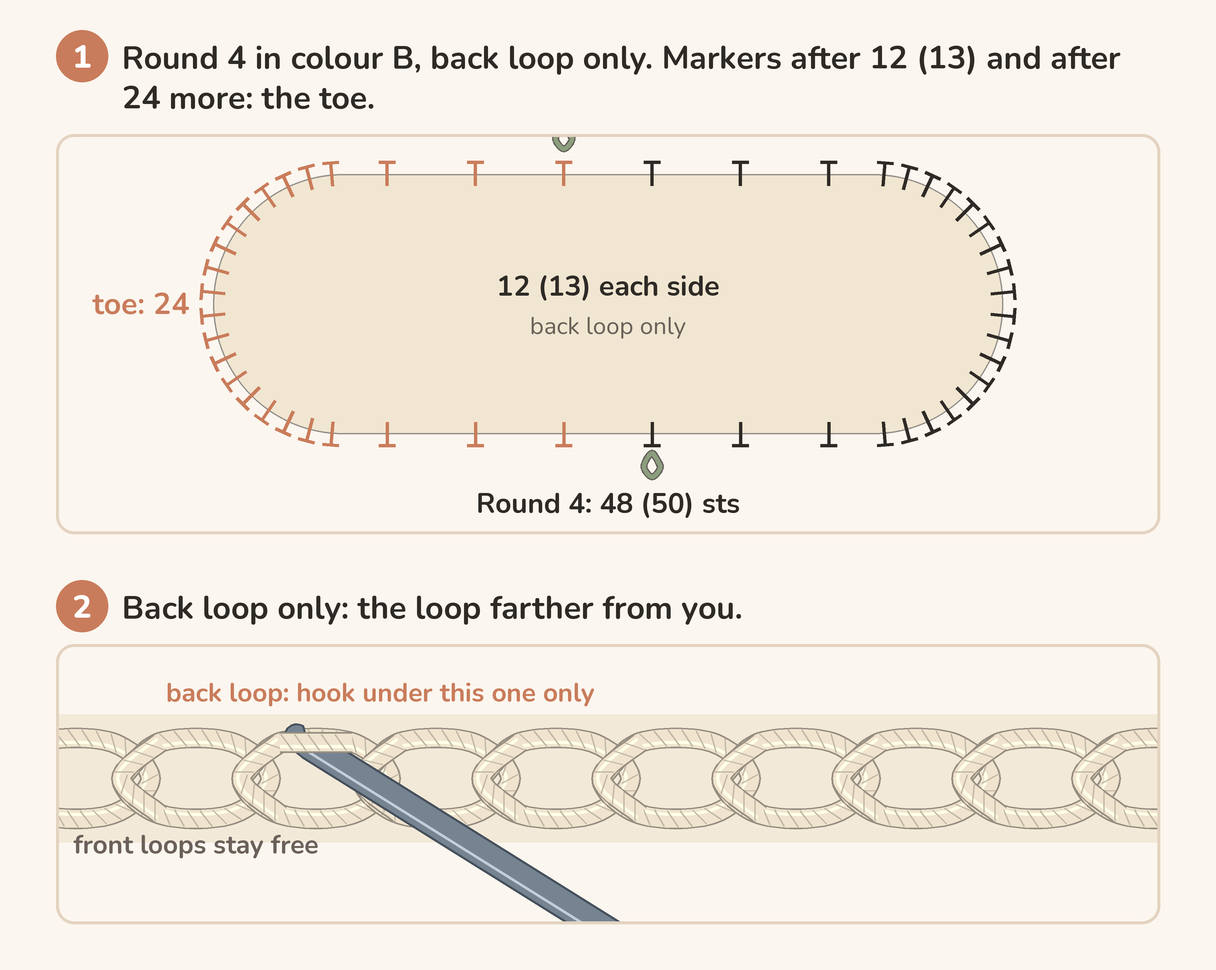
To change colour, insert the hook for the joining sl st, drop colour A to the back, and pull colour B through to finish the stitch. Ch 1, then work 1 hdc in the back loop only of each stitch. [48 (50) sts] The unworked front loops leave a ridge round the edge of the sole.
As you go, mark the round into three parts: count 12 (13) stitches and place a marker, count 24 more and place a second marker, then work the last 12 (13). The 24 stitches between the markers are the toe. Join with a sl st through both loops.
6. Round 5: the first toe decreases
Video: 21:46–27:20
Ch 1. From here, work through both loops. Work 1 hdc in each of the first 12 (13) stitches. Across the 24 toe stitches, work (hdc2tog, 1 hdc) 8 times. Work 1 hdc in each of the last 12 (13). Join. [40 (42) sts; the toe is now 16]
7. Round 6
Video: 27:20–31:41
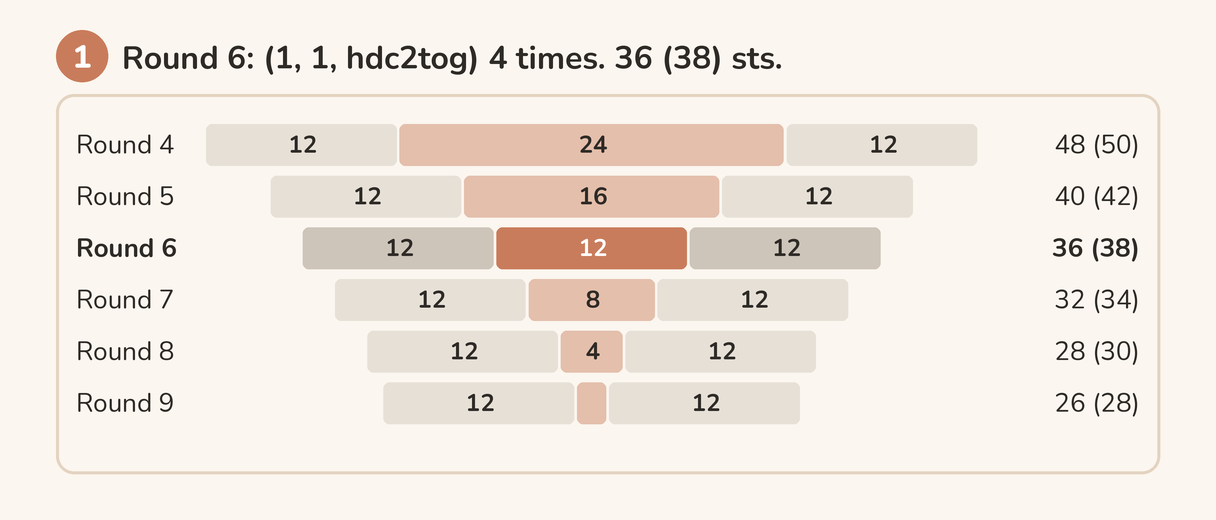
Ch 1. Work 12 (13) hdc, then (1 hdc, 1 hdc, hdc2tog) 4 times across the toe, then 12 (13) hdc. Join. [36 (38) sts; toe 12]
8. Round 7
Video: 31:41–35:30
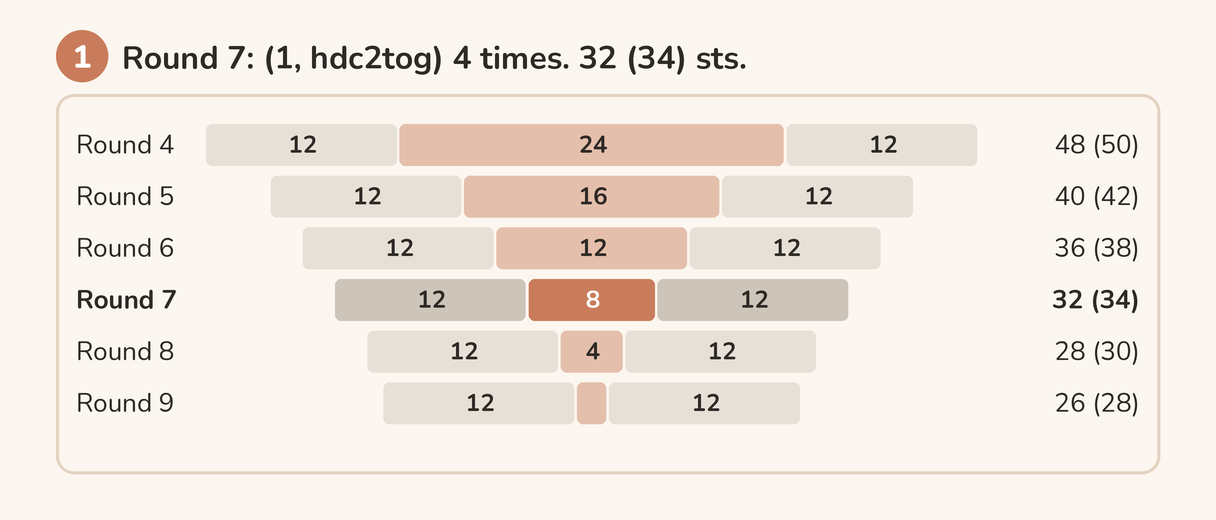
Ch 1. Work 12 (13) hdc, then (1 hdc, hdc2tog) 4 times across the toe, then 12 (13) hdc. Join. [32 (34) sts; toe 8]
9. Round 8
Video: 35:30–38:37
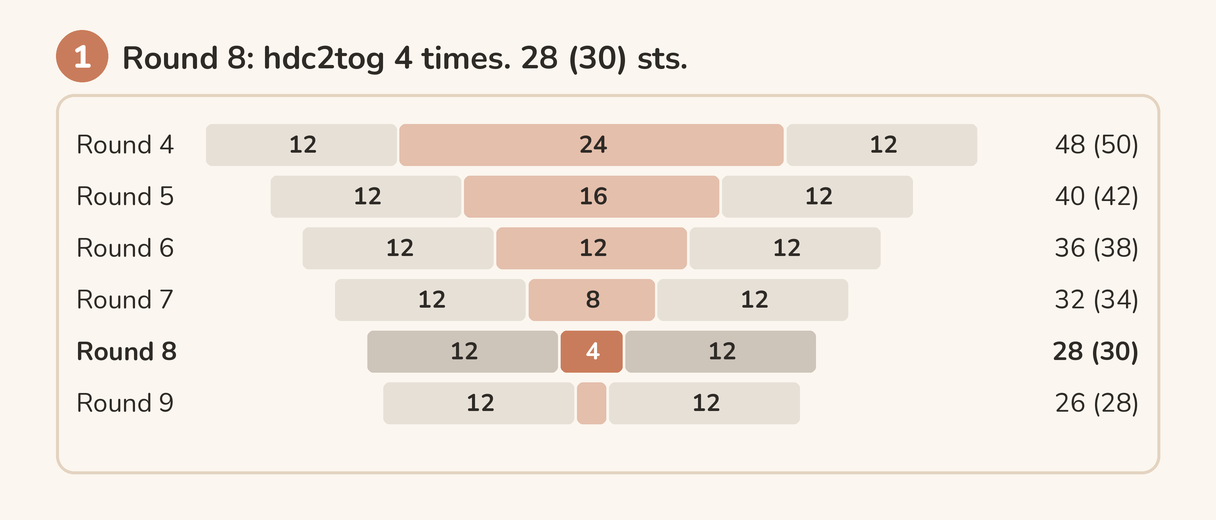
Ch 1. Work 12 (13) hdc, then hdc2tog 4 times across the toe, then 12 (13) hdc. Join. [28 (30) sts; toe 4]
10. Round 9: close the toe
Video: 38:37–41:10
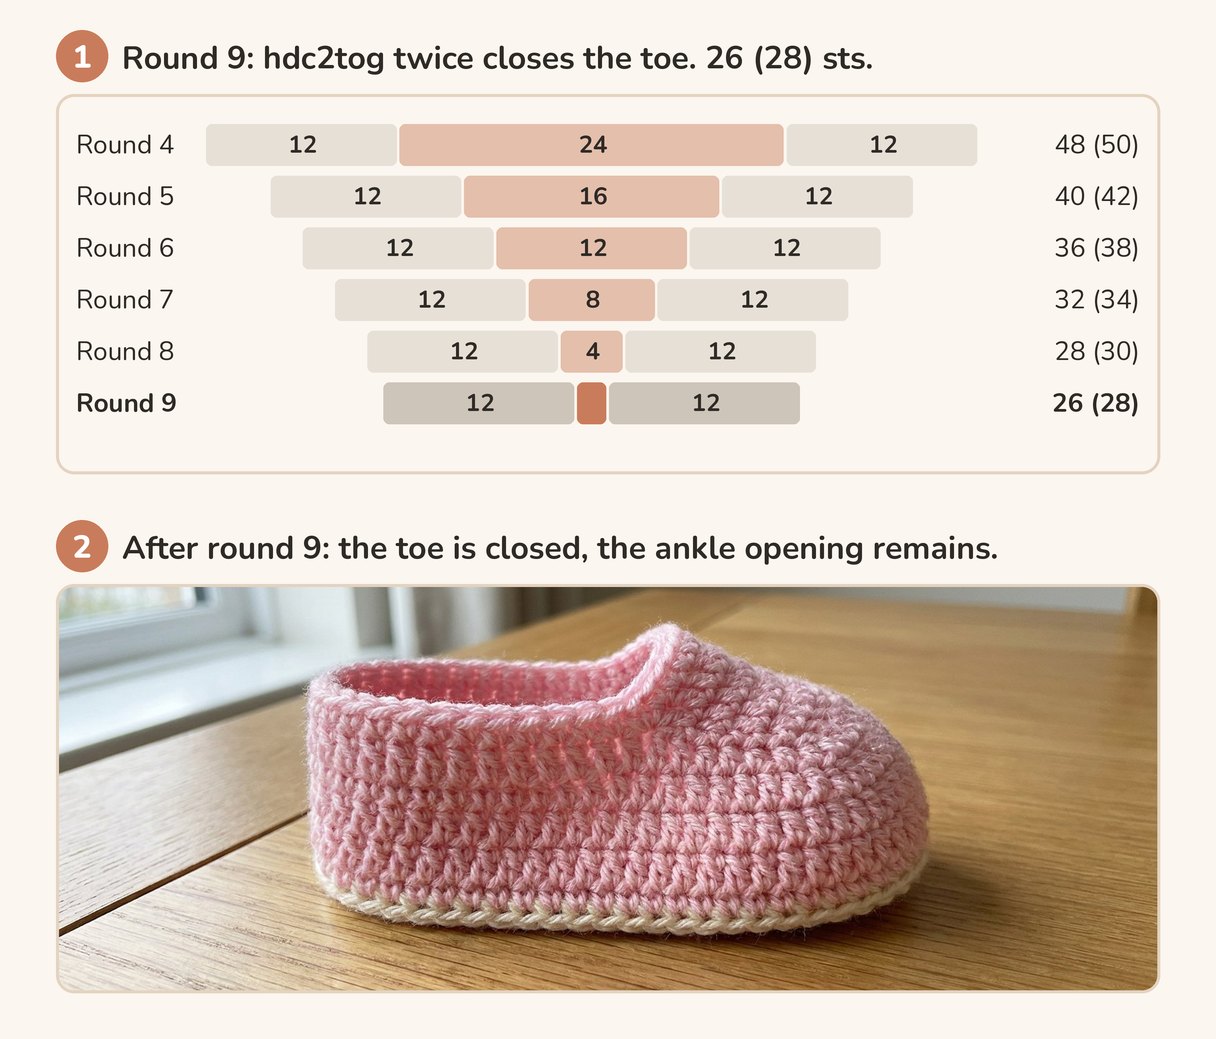
Ch 1. Work 12 (13) hdc, then hdc2tog twice, then 12 (13) hdc. Join. [26 (28) sts] The toe is closed and the markers can come out. The narrator calls this round 10 at 41:00, but the count shows it is round 9.
The ankle and the edge
11. Rounds 10 to 14: the ankle
Video: 41:10–44:41
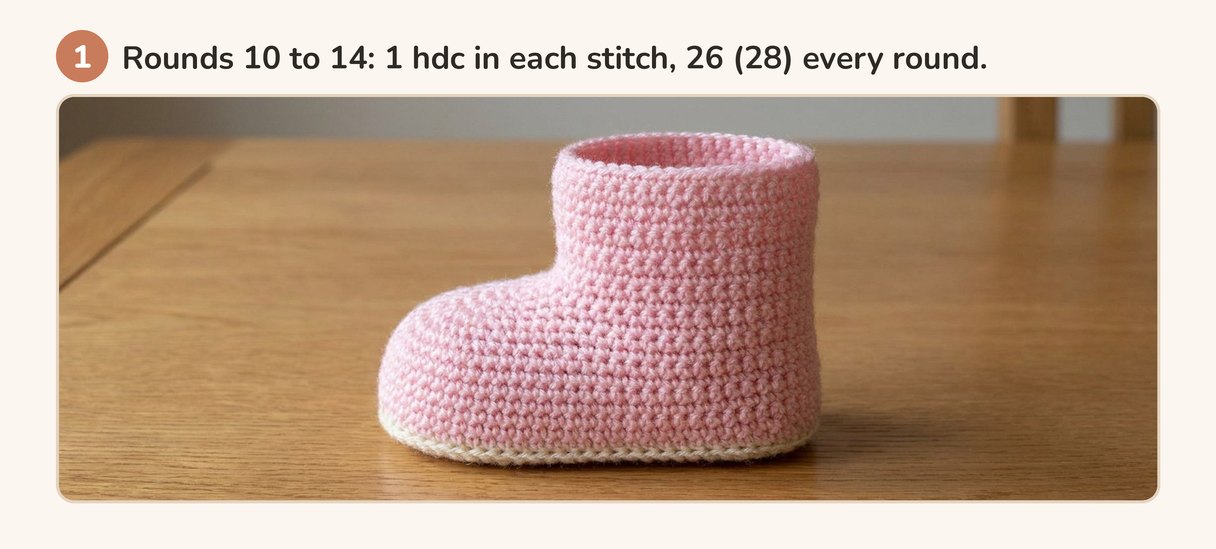
Work 5 rounds of 1 hdc in each stitch, joining each round. [26 (28) sts in every round] These straight rounds rise up round the ankle and are what holds the bootie on, since the design has no ties.
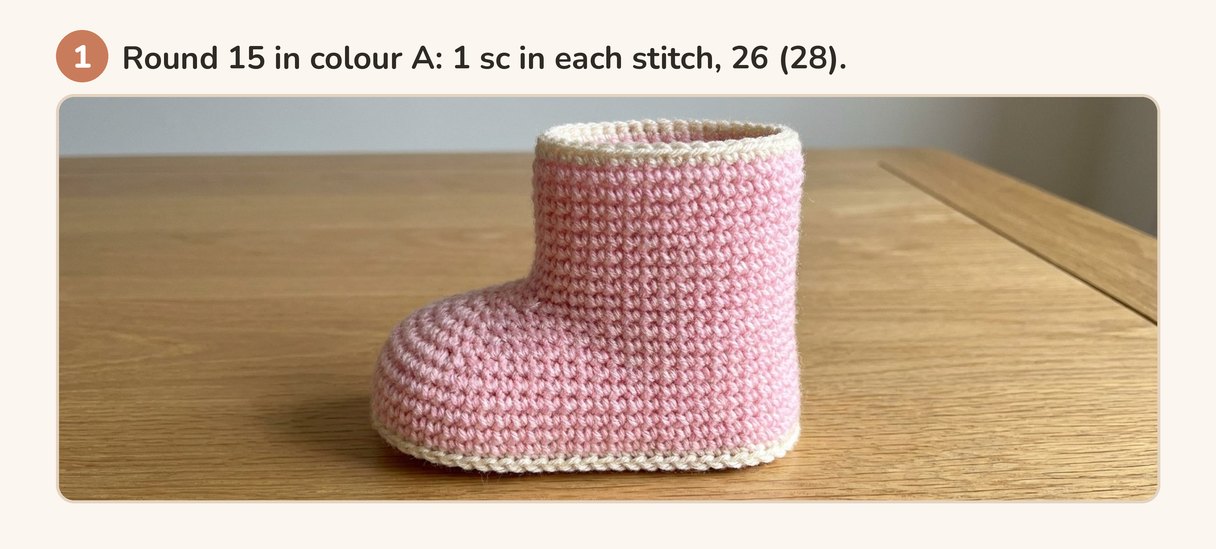
12. Round 15: the edge in colour A
Video: 44:41–47:00
Finish the last sl st of round 14 with colour A, the same way as the first colour change. Ch 1, then work 1 sc in each stitch. Join with a sl st. [26 (28) sts]
13. Weave in the ends
Video: 47:00–48:00
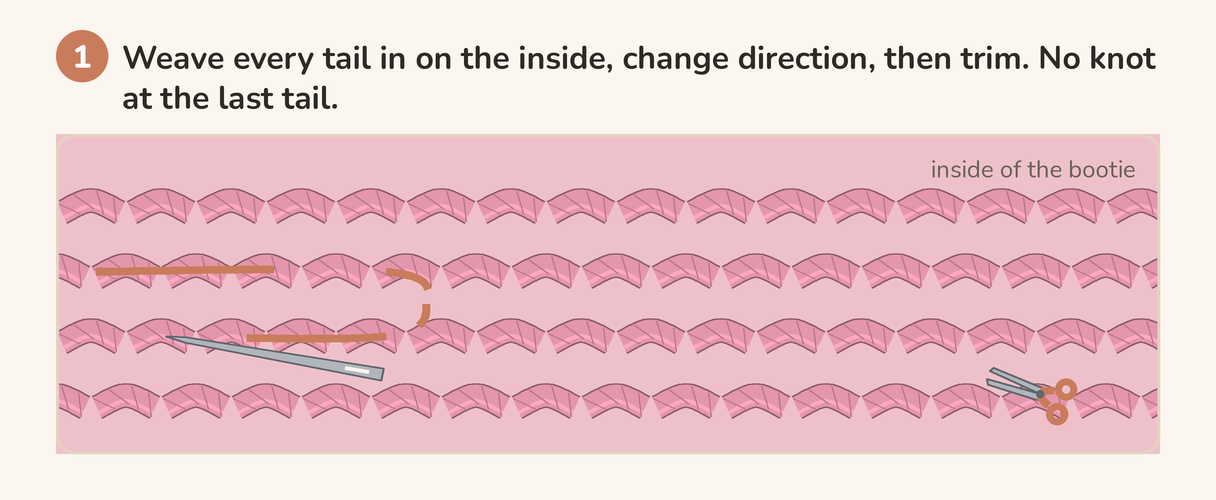
Cut the yarn and thread every tail onto the needle. Weave each one in on the inside, through several stitches, and trim. At the colour changes the video knots the two tails together first. For the last tail it uses no knot at all, because a knot inside a bootie presses on the foot. Make the second bootie the same way.
If something goes wrong
Your count is off after round 2 or 3. Count each part separately: the increases, then the straight run along each side. In the video’s narration an increase and a decrease have the same name, so a decrease worked by mistake in round 2 or 3 loses a stitch each time.
The sole cups up like a bowl. The increases are too tight. Work rounds 2 and 3 again with looser stitches, or go up one hook size.
The toe has gaps. The hdc2tog stitches are too loose. Pull each decrease snug, as the video recommends.
The bootie is too big or too small. Measure the sole after round 3, as in step 4, and change the hook before going further. The four sizes are half a millimetre of hook apart, so try that first.
The sides lean outward instead of standing up. Check that round 4 went into the back loops only. That round is what turns the sides up.
Frequently asked questions
Can I make them in one colour? Yes. The video shows a pair in a single colour. Skip both colour changes and work every round in one yarn.
How long do they take? The video estimates about 30 minutes for a bootie, depending on the size. A first pair will take longer while the counting becomes familiar.
Which size should I make for a gift? If you do not know the baby’s foot size, make 3–6 months. A bootie that is a little big now still fits later; one that is too small never will.
Do they stay on? There are no ties or straps. Five straight rounds round the ankle are what hold them. We have not tested the fit, so this is the design’s intent rather than a promise.
Are they safe for a baby? The design has no buttons, beads, ribbons or ties, so there are no small parts to come loose. Weave every end in securely so no loose strand can wrap round a toe.
Tutorial credit: Craft & Crochet, “Easy crochet baby booties”, 2021. Written up by crochetbabygifts from the video’s subtitles; crochet terms are in US English.