How to Crochet a Baby Blanket for Beginners: Free Pattern in Every Size
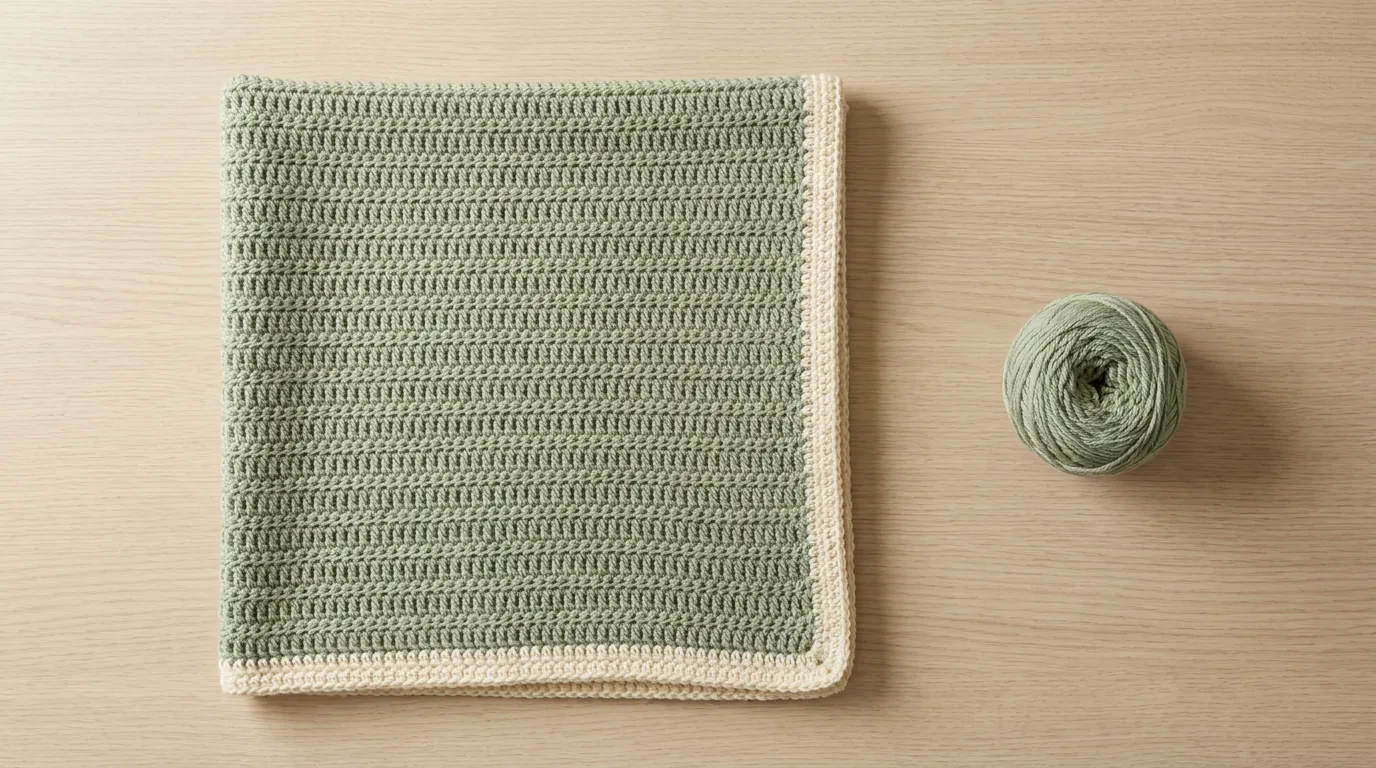
Chain one more than the stitches you want, work half double crochet into every stitch, row after row, until the blanket is long enough, then go round it three times in single crochet. That is the whole blanket. The rest of this page is the numbers that make it come out the size you meant: how many to chain from one small swatch, the stitch count every row must have, and exactly how many border stitches go along each side.
For a first blanket we suggest the 30 × 30 inch receiving size in worsted yarn on a 6 mm hook: chain 83, keep 82 stitches in every row, work about 73 rows, and have about 930 yards of yarn, which is three 364-yard skeins.
Download the free printable PDF: every size and yarn table, all 11 steps with their diagrams, and the three checks, ready to print. No sign-up.
We have not made this blanket ourselves yet. The rows follow the video below. The sizes, counts and border are worked out on this page, so you can check every number against your own stitches before you crochet them.
Watch the rows
The video is 15 minutes long. It shows the first stitch of the first row three times over, slowly, then the turning chain, the last stitch of a row, stitch markers and joining a new skein. Its blanket is 35 × 35 inches with no border, so the border on this page is ours. Each step below gives the minutes where the video shows it.
The blanket at a glance
| What | This blanket |
|---|---|
| Sizes | Preemie 18 × 24 in, receiving 30 × 30 in, stroller 30 × 35 in, crib 36 × 52 in |
| Stitches | Chain, half double crochet, single crochet, slip stitch. Nothing else |
| Yarn | Worsted (#4), DK (#3) or chunky (#5). Machine-washable |
| Hook | 6 mm (J-10) for worsted, 4 mm (G-6) for DK, 8 mm (L-11) for chunky |
| Construction | Rows of half double crochet, then 3 rounds of single crochet all the way round |
| Counting | The same number of stitches in every row, checked every 10 rows |
| Skill level | A first project. You need to make a chain and one stitch; this page and the video teach both |
Why the swatch comes first
Two published worsted blankets show why one fixed chain count cannot work for everyone. The video’s blanket comes out at about 11.5 half double crochet stitches to 4 inches on a 6 mm hook. A worsted blanket kit from a large yarn maker gives 14 stitches to 4 inches on a 5.5 mm hook. Chain the video’s 82 stitches at that second gauge and the blanket is about 23½ inches wide instead of 28½. That is 5 inches lost before you have made a mistake.
Your hands, your yarn and your hook decide the size. A swatch of about 20 stitches tells you how many to chain for the size you want and how much yarn to buy. Your gauge does not have to match ours. It only changes the numbers you use.
Pick your size
| Size | Inches | Centimetres | Use |
|---|---|---|---|
| Preemie | 18 × 24 | 46 × 61 | Hospital and NICU donations. Check the hospital’s own size and fibre rules first |
| Receiving | 30 × 30 | 76 × 76 | Newborn to 3 months, and the best first blanket: square, so both border sides are the same |
| Stroller | 30 × 35 | 76 × 89 | 3 to 12 months, the most-used gift size |
| Crib | 36 × 52 | 91 × 132 | The biggest. Long to make, so not a first project |
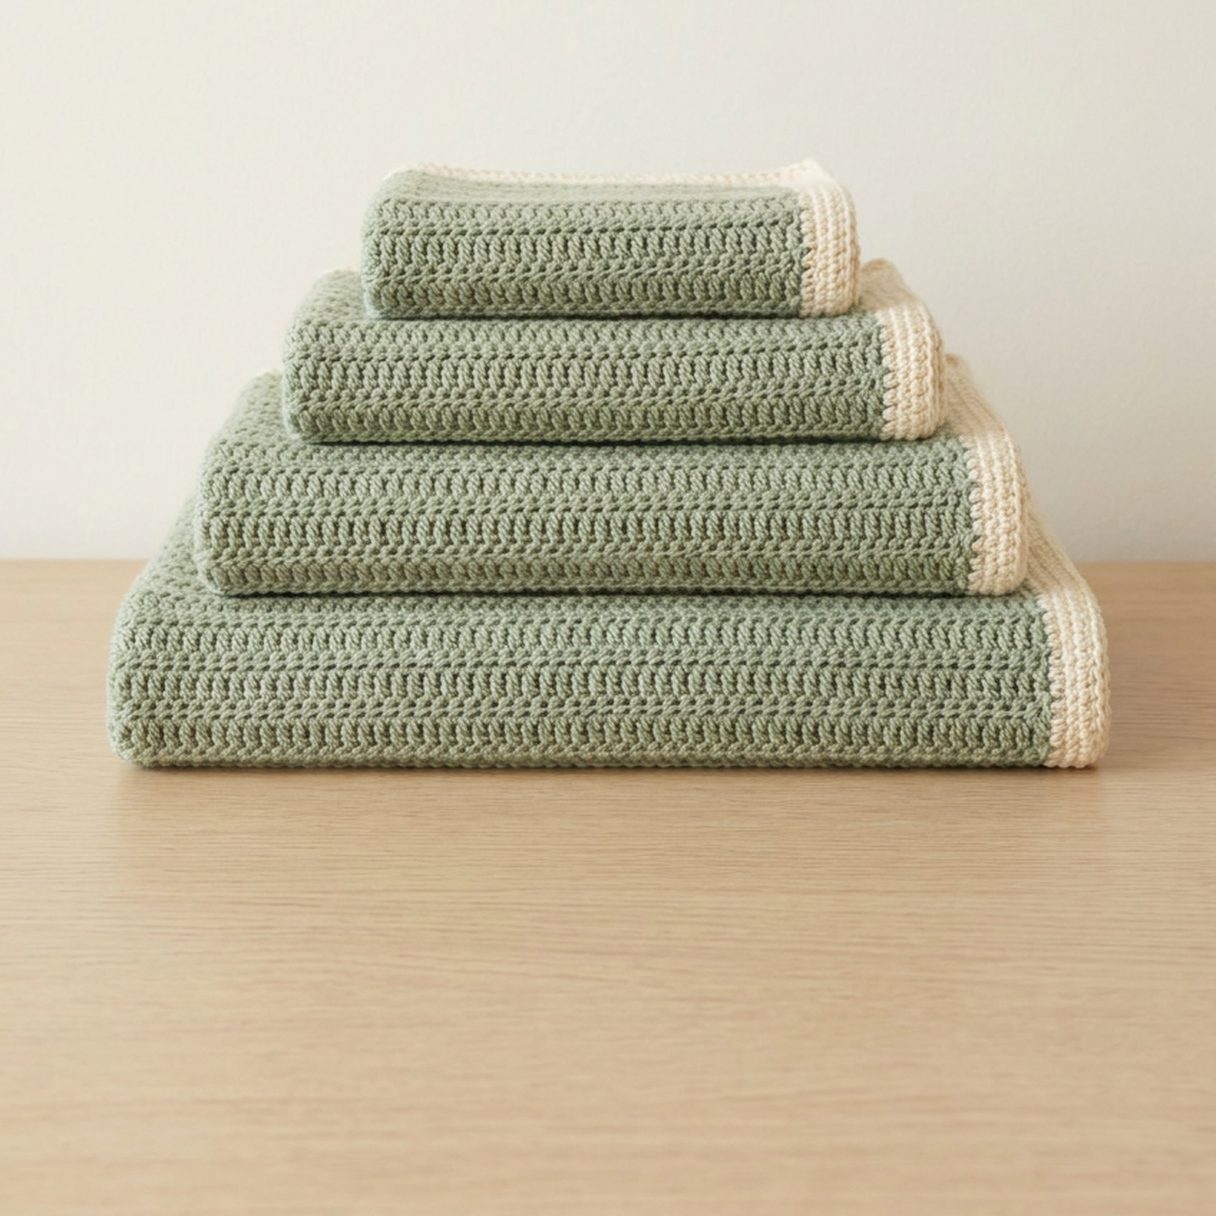
These are the sizes from our crochet baby blanket size chart. The finished size includes the border.
A blanket is for cuddles, the pram and floor time with an adult watching. It is not for the crib: the American Academy of Pediatrics advises keeping blankets out of a baby’s sleep space for the first year. Our crochet blanket safety guide has the detail.
What you need
Every tool our patterns use is on the Crochet essentials page.
- Worsted (#4) acrylic yarn: the video uses Red Heart Super Saver, 364 yards (333 m) per 7 oz (198 g) skein, which can go in the washing machine and the dryer. Any machine-washable yarn in the same weight works. DK and chunky work too; the tables below give the yarn amount for each.
- A crochet hook: 6 mm (J-10) for worsted. The yarn label says 5.5 mm (I-9). The video goes one size up because looser stitches are easier to see and to get the hook into, and the blanket drapes better. 4 mm (G-6) for DK and 8 mm (L-11) for chunky. The hook size chart gives the letters.
- At least 2 locking stitch markers, or short pieces of a different-coloured yarn. Six make the border easier: one in each corner and two for counting.
- A tape measure, for the swatch and the checkpoints.
- A blunt tapestry needle for weaving in the ends, and scissors.
Abbreviations
US crochet terms throughout. The UK name is in brackets.
- ch: chain
- hdc: half double crochet (UK: half treble, htr). Yarn over, put the hook into the stitch, yarn over and pull up a loop (3 loops on the hook), yarn over and pull through all 3.
- sc: single crochet (UK: double crochet, dc). Put the hook into the stitch, yarn over and pull up a loop (2 loops), yarn over and pull through both.
- sl st: slip stitch. Put the hook into the stitch, yarn over and pull through the stitch and the loop on the hook.
- st, sts: stitch, stitches.
- Turning chain: the 2 chains at the start of each row. In this pattern they count as the first stitch of the row, as in the video.
The pattern
1. Make a swatch and measure it
Chain 21. Work rows 1 to 3 below on these 21 chains, then repeat row 3 until you have 12 rows. You have 20 stitches in every row. Lay the swatch flat without stretching it. Put the tape measure across the middle and count the stitches in 4 inches, halves included. Then measure 4 inches up the middle and count the rows.
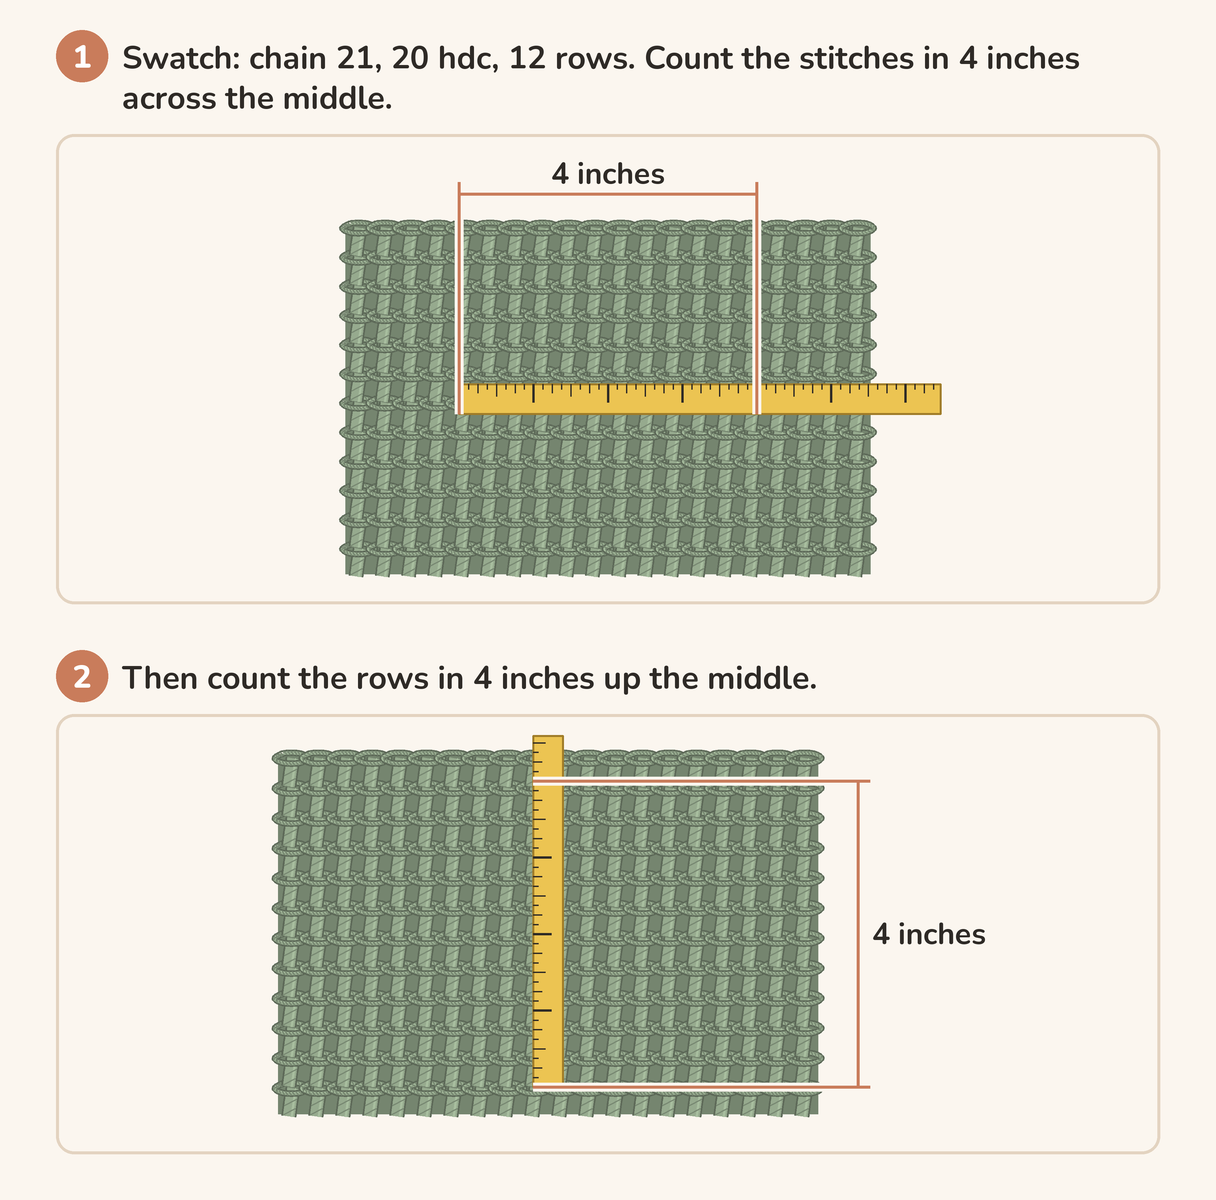
Write both numbers down. Those two numbers make every other number on this page fit your blanket. If you would rather start straight away, use our numbers for your yarn weight from the tables in step 2, and check the width at the first checkpoint (step 6).
2. Work out how many to chain
Four sums, all from your swatch:
- Body width = the finished width minus the border. The border takes about 1½ inches off the width in worsted, 1¼ in DK and 2½ in chunky (three rounds of single crochet on both sides).
- Stitches in every row = body width × your stitches in 4 inches ÷ 4. Round to the nearest whole stitch.
- Chain = stitches + 1.
- Rows = body length × your rows in 4 inches ÷ 4. This one is only a guide, because you will stop by measuring (step 8).
Worked example. Receiving size in worsted, and your swatch has 13 stitches in 4 inches: body width 30 − 1½ = 28½ inches. 28½ × 13 ÷ 4 = 92.6, so 93 stitches. Chain 94.
Head to foot or side to side? On a square blanket it makes no difference. On a rectangle, chain along the shorter side: the rows are shorter, so you reach a checkpoint sooner and a counting mistake costs fewer stitches.
Our numbers for three sample gauges. If your swatch matches one of these, use its table as it is. If it does not, use your own numbers in the four sums above. Sizes are the finished sizes from the table above. Border sides are the stitches between the corners on the top and bottom, then on each side; round 1 is the whole first border round. Both are explained in step 9.
Worsted (#4): 6 mm (J-10) hook, about 11.5 hdc and 10.3 rows to 4 in, from the video’s blanket
| Size | Chain | Stitches | Rows | Border sides | Round 1 | Yarn |
|---|---|---|---|---|---|---|
| Preemie | 49 | 48 | 58 | 46 / 63 | 230 | 450 yd |
| Receiving | 83 | 82 | 73 | 80 / 80 | 332 | 930 yd |
| Stroller | 83 | 82 | 86 | 80 / 95 | 362 | 1,080 yd |
| Crib | 101 | 100 | 130 | 98 / 144 | 496 | 1,920 yd |
DK (#3): 4 mm (G-6) hook, about 16 hdc and 15.2 rows to 4 in, from an estimate from a DK yarn label
| Size | Chain | Stitches | Rows | Border sides | Round 1 | Yarn |
|---|---|---|---|---|---|---|
| Preemie | 68 | 67 | 86 | 65 / 89 | 320 | 800 yd |
| Receiving | 116 | 115 | 109 | 113 / 113 | 464 | 1,650 yd |
| Stroller | 116 | 115 | 128 | 113 / 133 | 504 | 1,920 yd |
| Crib | 140 | 139 | 193 | 137 / 201 | 688 | 3,410 yd |
Chunky (#5): 8 mm (L-11) hook, about 9 hdc and 8 rows to 4 in, from Bernat’s published chunky blanket
| Size | Chain | Stitches | Rows | Border sides | Round 1 | Yarn |
|---|---|---|---|---|---|---|
| Preemie | 36 | 35 | 43 | 33 / 46 | 170 | 410 yd |
| Receiving | 63 | 62 | 55 | 60 / 60 | 252 | 840 yd |
| Stroller | 63 | 62 | 65 | 60 / 71 | 274 | 980 yd |
| Crib | 77 | 76 | 99 | 74 / 109 | 378 | 1,730 yd |
The worsted yarn amounts come from the video’s own blanket: three 364-yard skeins made 35 × 35 inches, so it used at most 0.89 yards per square inch. The DK and chunky amounts come from our how much yarn for a baby blanket method, which runs on the cautious side; at worsted it would have asked for about 28% more than the video needed. All amounts include 15% spare. Buy every skein from the same dye lot.
The DK row is an estimate. We found no yarn maker who publishes a half double crochet gauge for a named DK yarn, so we started from a DK label’s single crochet gauge (16 stitches and 19 rows to 4 inches on a 4 mm hook) and used the ratio from a chunky yarn whose maker publishes both. Your swatch replaces it.
3. Row 1
Video: 3:39 to 6:33
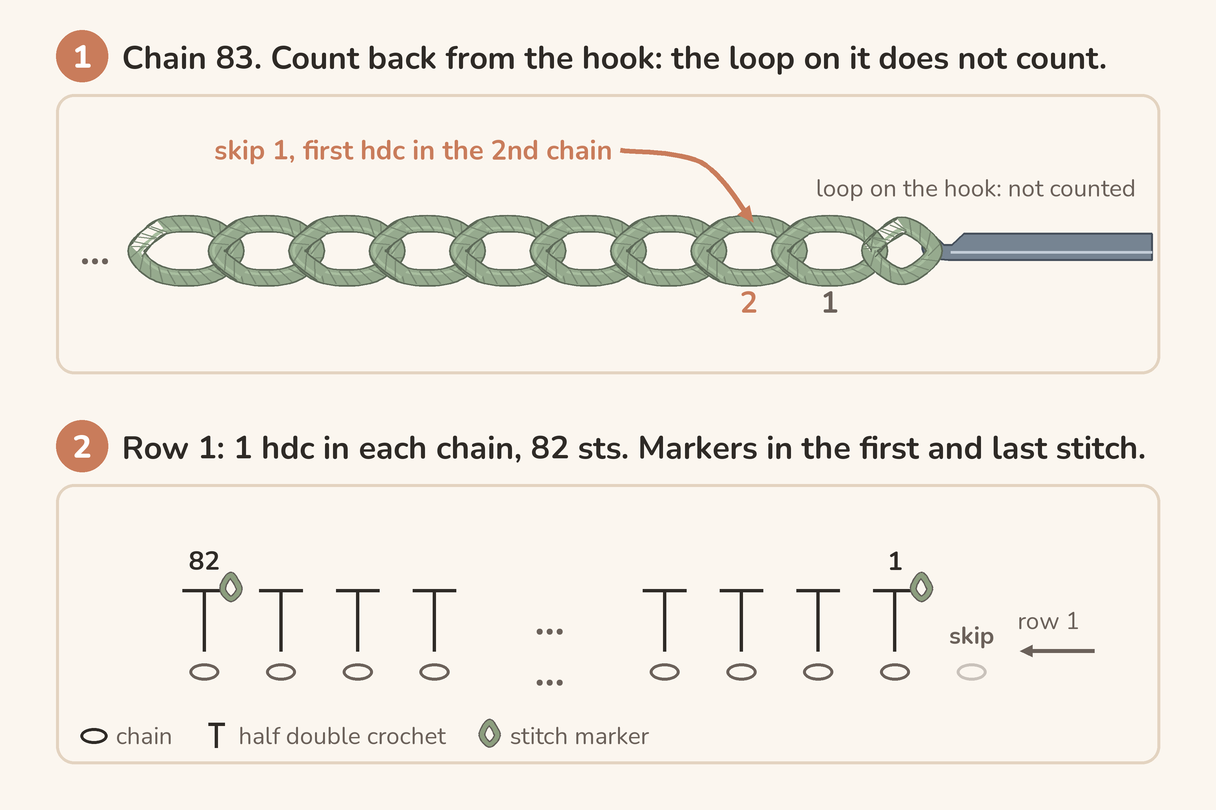
Make a slip knot and chain 83 (or your chain number). Work 1 hdc into the 2nd chain from the hook. The loop on the hook does not count, so count 2 chains back from it. Then work 1 hdc into each chain to the end. [82 sts]
Put a stitch marker into the first stitch and another into the last stitch of the row.
4. Row 2
Video: 7:01 to 8:56
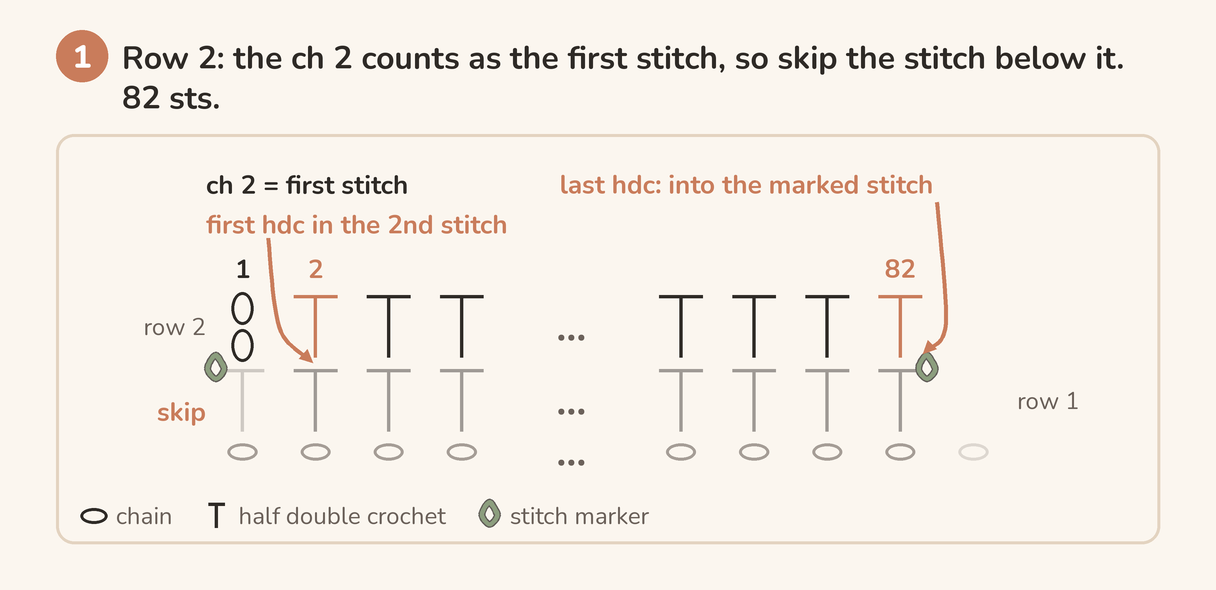
Ch 2 and turn the work. The ch 2 counts as the first stitch, so skip the first stitch below it and work your first hdc into the 2nd stitch, under both loops at the top. Work 1 hdc into each stitch across. Your last hdc goes into the marked stitch at the end: it is the first hdc you made in row 1. [82 sts]
Move the markers up: one into the top of the ch 2 you just made, and one into the last stitch. The marker in the ch 2 shows you where the next row ends.
5. Row 3 and every row after it
Video: 9:09 to 9:37
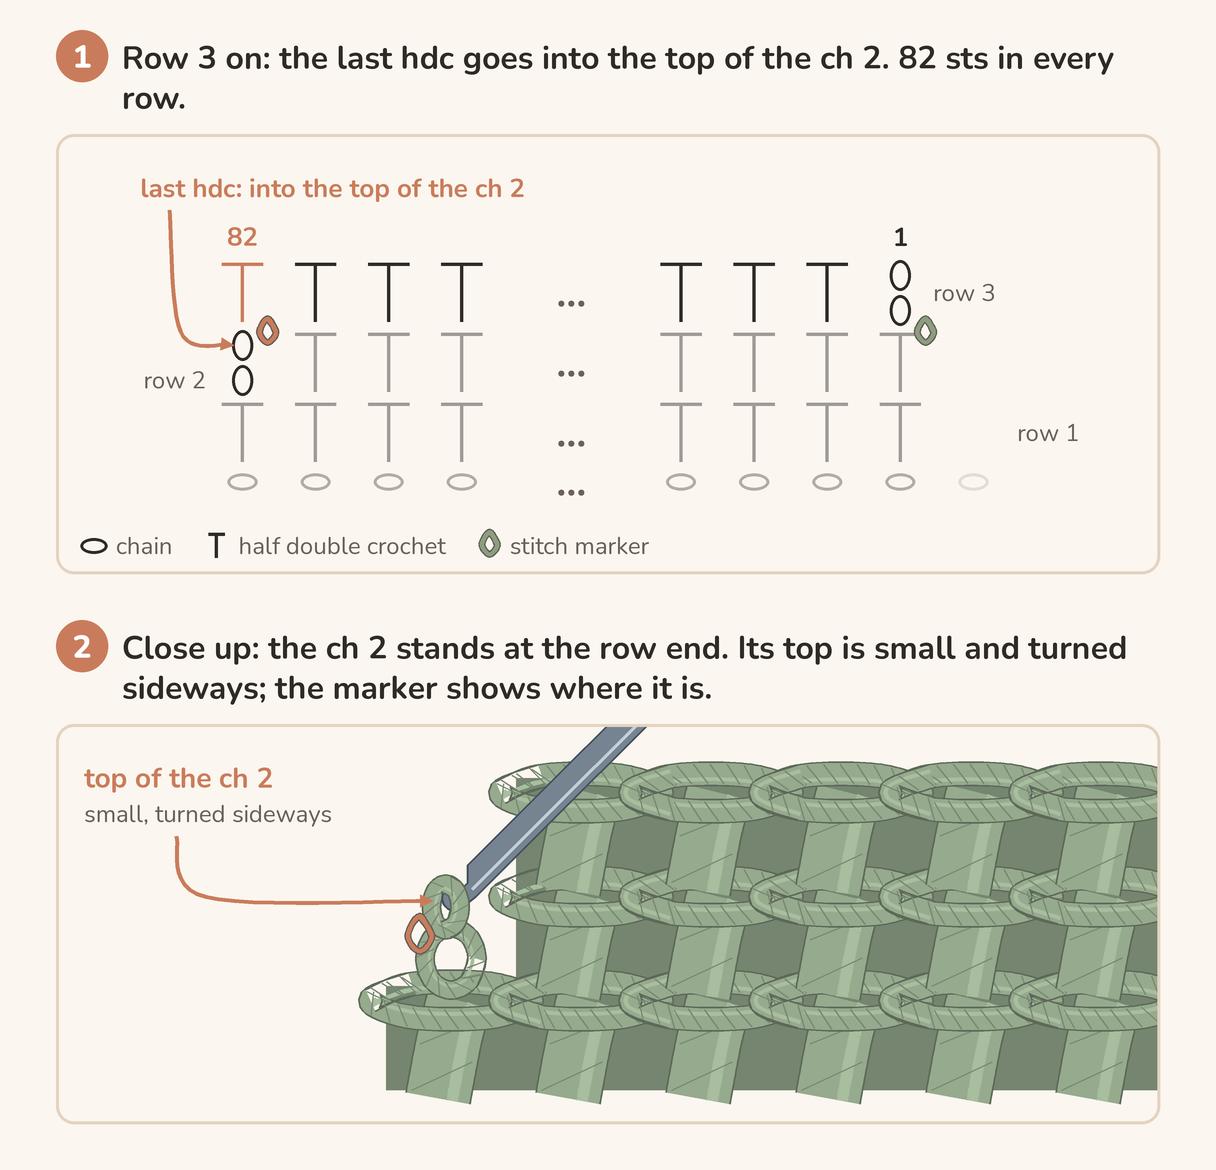
Ch 2 and turn. Skip the first stitch and work 1 hdc into each stitch across. The last hdc goes into the top of the ch 2, where the marker is. Move the markers up. [82 sts in every row]
This last stitch is the one that goes missing. The top of a ch 2 is small and sits sideways, and if you skip it the row is one stitch short and the blanket starts to narrow. If it is hard to see, the marker is your guide: it is always the last stitch.
6. A checkpoint every 10 rows
Every 10 rows, stop and do two things:
- Count the stitches in the row you just finished. It must be your number (82 in our receiving size). Counting is faster in tens: put a marker every 10 stitches the first time.
- Measure the width across the bottom, the middle and the top. They should be within half an inch of each other.
Ten rows is about 4 inches of blanket in worsted, 2½ inches in DK and 5 inches in chunky. To count rows, look for the ridges: in this stitch a ridge shows every two rows (video: 14:08).
If the count is right and the widths agree, keep going. If not, go to Border or frog: three checks before you work another row. A checkpoint every 10 rows means a mistake never costs more than 10 rows.
7. Joining a new skein
Video: 9:37 to 11:09
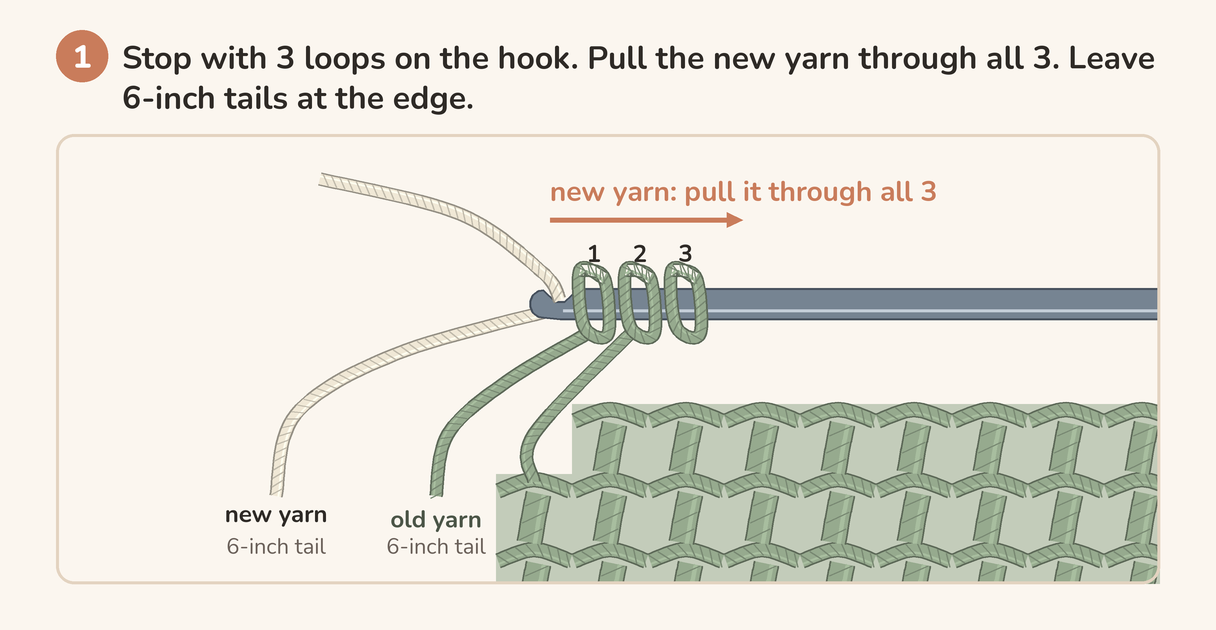
Join at the end of a row if you can, so the tails sit in the edge where the border will cover them. Work the last stitch of the row until there are 3 loops on the hook. Drop the old yarn, leaving a 6-inch tail. Pick up the new yarn, also with a 6-inch tail, and pull it through all 3 loops. Ch 2 with the new yarn and carry on.
If the yarn runs out in the middle of a row, the same method works there too, as the video shows. Never tie a knot to join: a knot can work loose in the wash.
8. When to stop
Stop when the blanket measures its finished length minus the border: 28½ inches for the receiving size in worsted. That is about 73 rows, but the tape measure decides, not the row count. Finish the last row with all its stitches. Do not fasten off: the border starts here.
9. The border, round 1
The border goes once round all four sides. It is where counts matter most, because too many stitches along a side make it ruffle and too few make the corners curl in. So every side has a number.
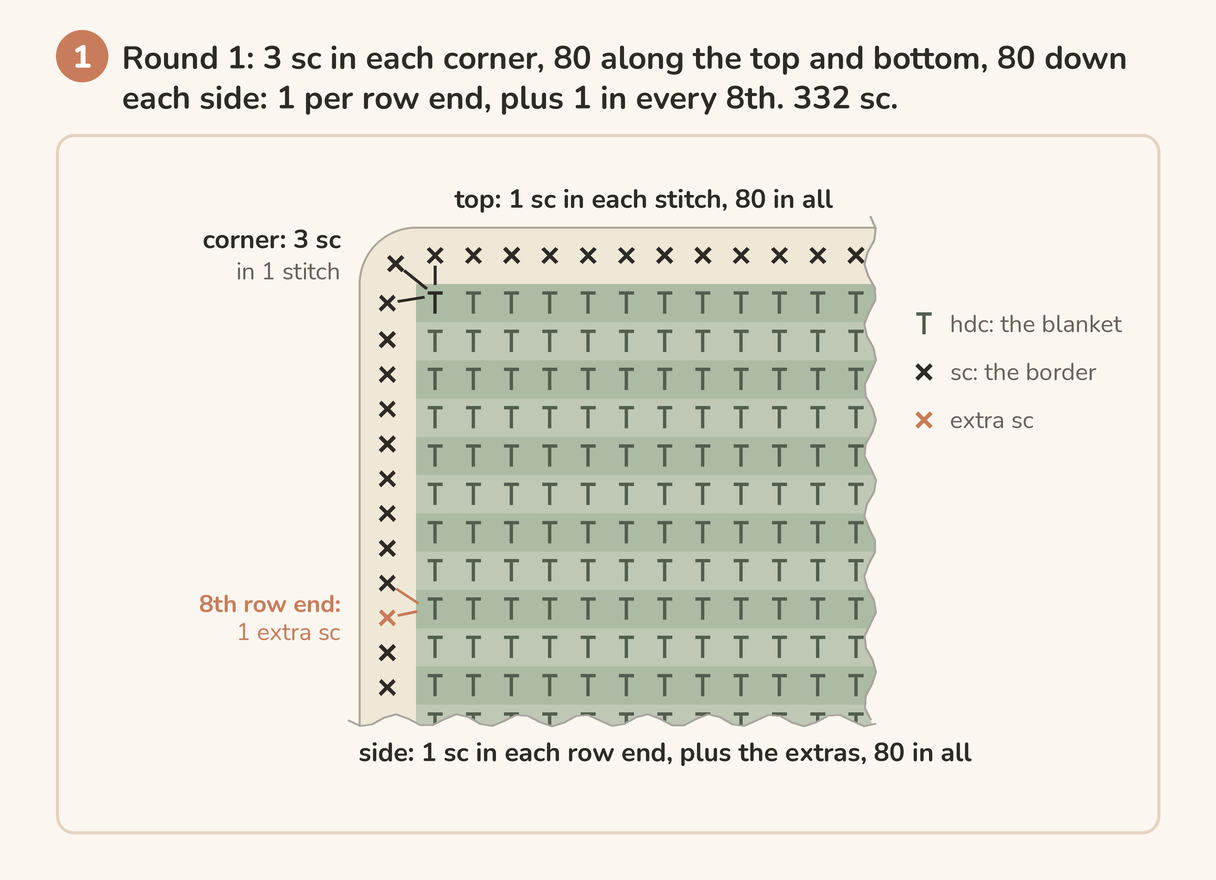
The top and bottom are easy: one sc in each stitch. The sides are row ends, and half double crochet rows are taller than single crochet stitches are wide, so you need slightly more than one sc per row. The amount is your stitches in 4 inches divided by your rows in 4 inches. At the video’s gauge that is 11.5 ÷ 10.3 = 1.12: one sc in each row end, plus one extra in about every 8th row end. At our DK estimate it is one extra about every 18th row end, and in chunky about every 8th.
For the receiving size in worsted:
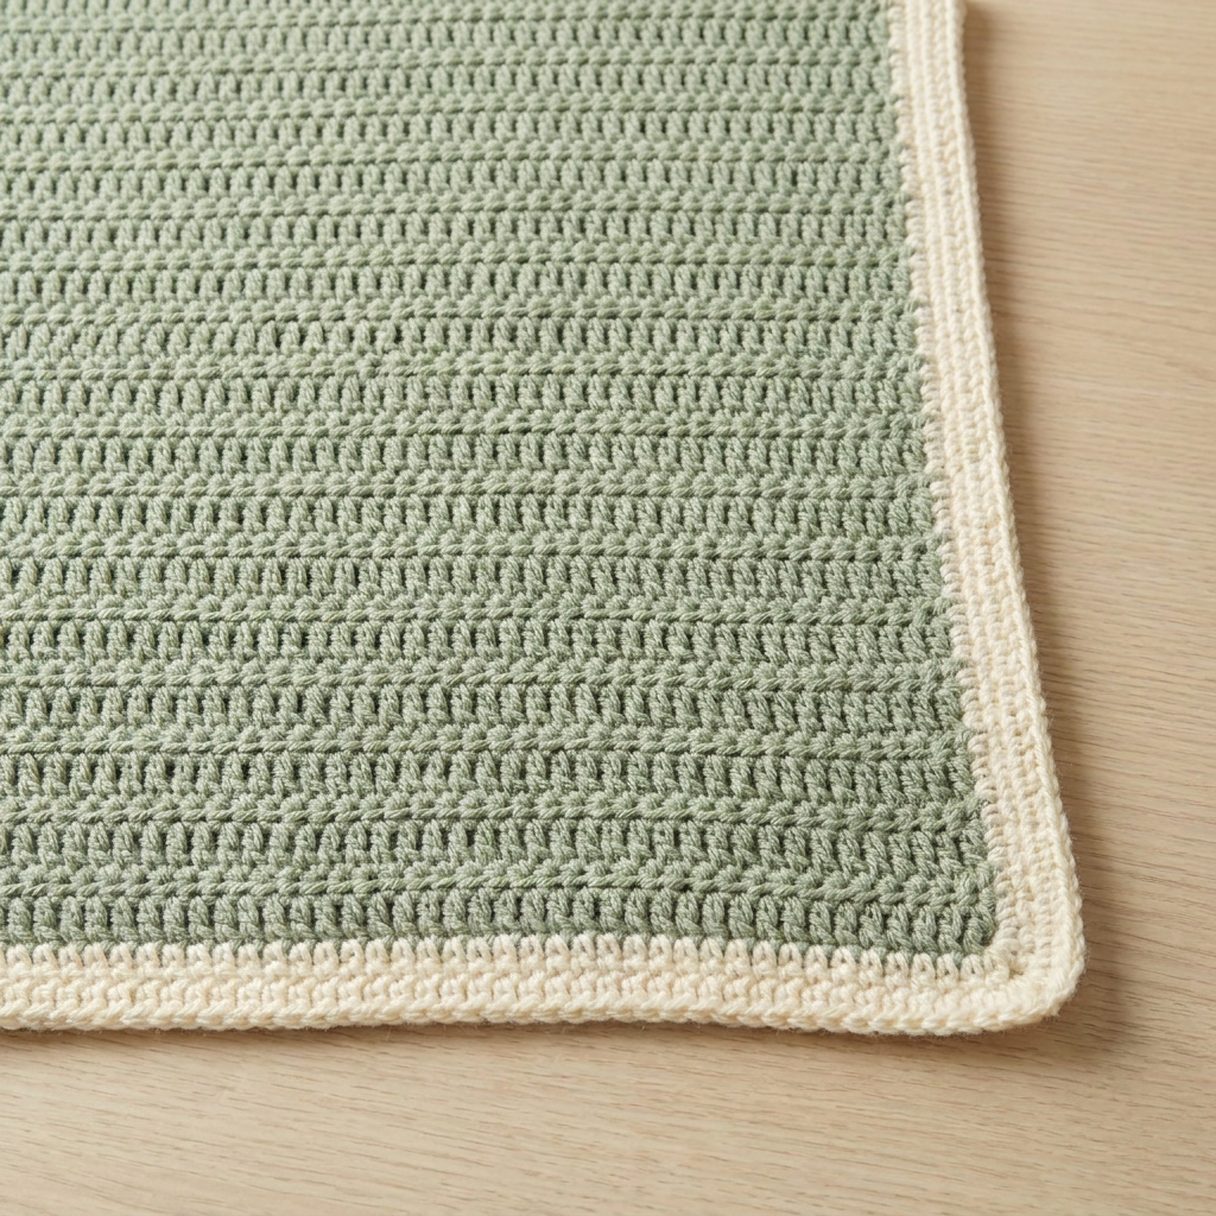
- Top. Ch 1 and turn, as if starting a new row. Work 3 sc into the first stitch: that is the first corner. Work 1 sc into each stitch across until 1 stitch is left [80 sc]. Work 3 sc into the last stitch: the second corner.
- First side. Turn the blanket so the side is on top. Work sc down the row ends, putting the hook through the side of the end stitch of each row: 1 sc in each row end, plus 1 extra in every 8th row end [80 sc].
- Bottom. You are now at the foundation chain. Work 3 sc into the first chain that has a stitch in it (the corner). Work 1 sc into each chain across, into the loop left free by row 1, until 1 chain with a stitch is left [80 sc]. Work 3 sc into it.
- Second side. Work up the row ends the same way as the first side [80 sc].
- Join. Sl st into the first sc of the round. [332 sc: 80 + 80 + 80 + 80, plus 3 in each of the 4 corners]
The table in step 2 gives the two side counts and the round 1 total for every size and yarn. If your numbers came from your own swatch: top and bottom = your stitches − 2, and each side = rows × your stitches ÷ your rows, − 2.
Count each side before you join. If a side is a few stitches off, take out the last few and space them again. It is quicker now than after round 3.
10. Border rounds 2 and 3
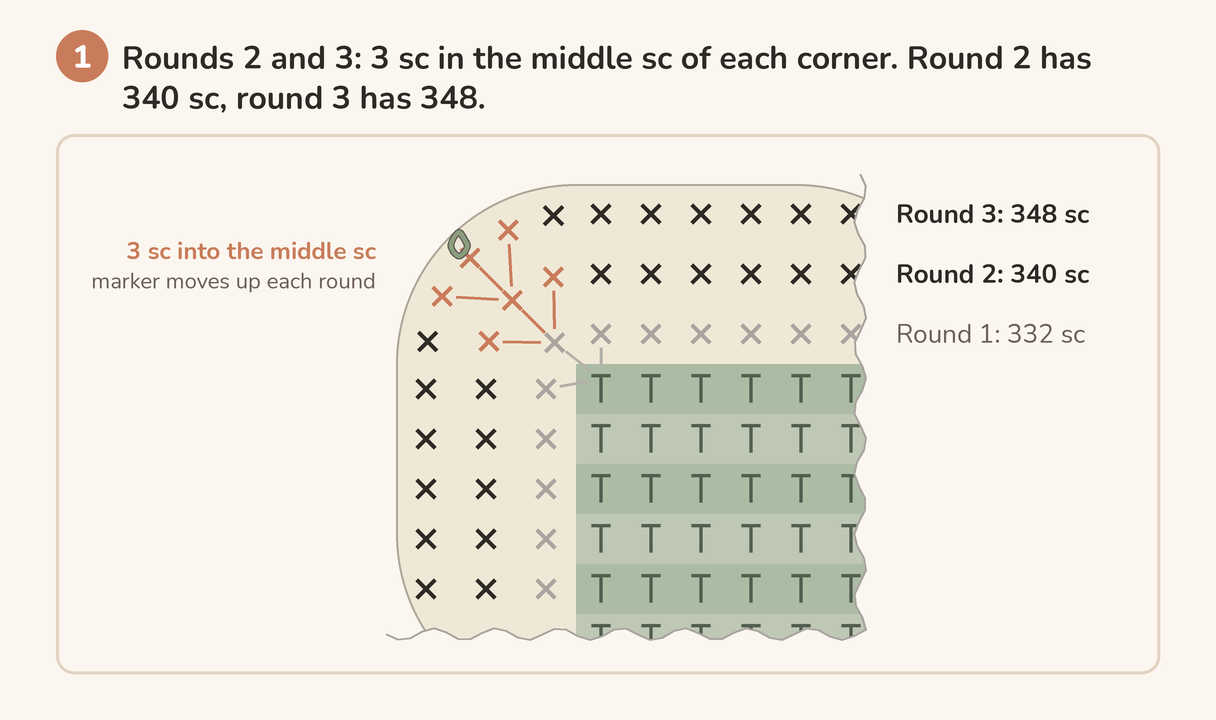
Ch 1. Work 1 sc into each sc round, and at each corner work 3 sc into the middle sc of the 3. Sl st into the first sc. Each side gains 2 stitches every round, so the round grows by 8. [Round 2: 340 sc. Round 3: 348 sc]
The middle sc of each corner is easy to lose. Put a marker in it on round 1 and move it up each round.
Fasten off: cut the yarn leaving a 6-inch tail and pull it through the last loop (video: 11:33).
11. Weave in the ends and wash
Video: 12:35 to 13:41
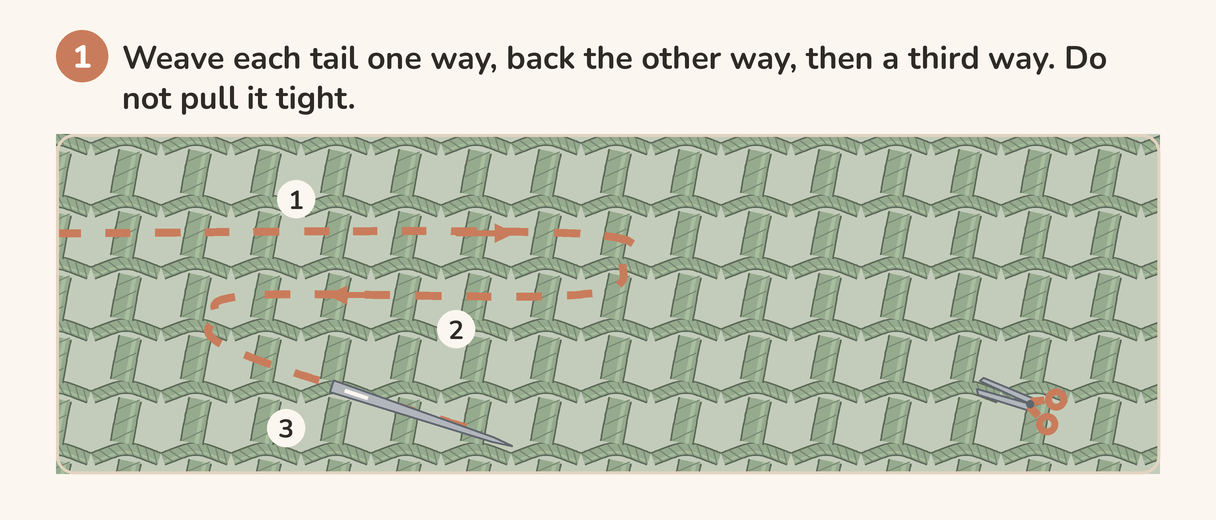
Thread each tail onto the tapestry needle. Weave it through the stitches one way, then back the other way, then a third way, as the video does. Changing direction is what holds it when the blanket is washed. Do not pull it tight: it should hide in the stitches, not pucker them. Trim close.
Wash the blanket once before you give it, by its yarn label. Our guide to washing a crochet baby blanket covers the machine settings and drying.
Border or frog: three checks
Wonky edges on a first blanket are normal, and the usual question is whether a border will hide them or the rows have to come out. A border goes round the outside of the blanket. It can even out a wobbly edge, because you place its stitches by measuring rather than by row. It cannot add width in the middle. So the answer depends on which of these you have.
Check 1: count. Count the last row. Is it your number?
Check 2: measure. Measure the width at the bottom, the middle and the top, laid flat without stretching.
Check 3: look at the shape. Lay it on the floor. Does the edge wobble in and out, or does the whole blanket get steadily narrower or wider toward the top?
What to do, by what you found:
| You found | What it means | What to do |
|---|---|---|
| Count right, widths within half an inch, edge wobbles | Uneven edge stitches, not lost stitches | Keep going. Border round 1, spaced by measurement, evens it out |
| Count 1 or 2 off in one row | A stitch missed or added once | Fix it on the next row: work 2 hdc into one stitch near the middle if you are short, or skip one stitch near the middle if you are over. Then keep going |
| Widths differ by half an inch to an inch | A few stitches lost or gained over several rows | Fix the count on the next row, then watch the next checkpoint. A border will make the edge look straight but the blanket will stay slightly wider at one end |
| Widths differ by more than an inch, or get worse every checkpoint | Stitches lost or gained in most rows: the blanket is wider at one end than the other | Frog back to the last checkpoint where the count and widths were right. A border cannot fix this |
Why those lines: in worsted at the video’s gauge one stitch is about a third of an inch wide, so half an inch is one or two stitches and an inch is about three. Those are our rules of thumb, worked out from the stitch width, not a tested result.
Some crocheters even out a wobbly edge in border round 1 by using a taller stitch where the edge dips: a half double crochet instead of a single crochet in the low spots. That is a common suggestion on crochet forums rather than something we have tried. If you do it, keep the same number of stitches per side.
What most guides get wrong
One chain count for everyone. Most free beginner blankets give one number, such as chain 41 or chain 102, and no gauge. Two copies of one popular pattern even disagree about it. Without your gauge, a chain count is a guess about someone else’s hands.
No stitch count on each row. Rows that silently lose a stitch are the main reason first blankets narrow. A count after every row, and a checkpoint every 10, catch it while it is cheap to fix.
“Two single crochet per row” along the sides. Some border guides say this. At a worsted gauge of about 14 stitches and 12 rows to 4 inches, the right amount is about 1.17 per row, so two per row puts about 70% too many stitches on each side. That is exactly how a border ends up ruffled. Others say one per row, which is close but a little short for half double crochet. The right number comes from your own swatch.
The border in one line. “Sc evenly around with 3 sc in each corner” is the whole border in most patterns. Evenly is the hard part, so this page gives every side a number.
If something goes wrong
The blanket is getting narrower. The last stitch of each row is being missed, usually the top of the ch 2. Keep a marker in it every row (step 5), and use the three checks above.
The blanket is getting wider. A stitch is being worked into the first stitch, below the ch 2, as well as the ch 2 counting as one. Skip the first stitch at the start of every row.
The edges are wavy. Tension at the ends of the rows is looser or tighter than in the middle. If the count is right, the border will even it out.
The border ruffles. Too many stitches on that side. Take the side back and space it with fewer, using the count in the table.
The corners curl in. Too few stitches at the corner, or the border is worked tighter than the blanket. Check there are 3 sc in each corner on every round. If they are there, work the border with a hook one size bigger.
The yarn ran out. Join a new skein the same way (step 7). If the new skein is from a different dye lot, join it at the start of a row so any change in shade is a straight line.
It came out too small or too big. Measure at the first checkpoint, not at the end. If the width is out by more than an inch, it is cheaper to start again with a new chain count from your swatch than to finish a blanket the wrong size.
Frequently asked questions
How many chains do I need for a baby blanket? It depends on your yarn and hook. For the 30 × 30 inch receiving size, chain 83 in worsted at the video’s gauge, about 116 in DK, or 63 in chunky. Step 2 shows how to get your own number from a swatch.
What size should a first baby blanket be? The receiving size, 30 × 30 inches. It is square, so both border sides take the same count, and it is the smallest size a baby can use for a while. The size chart has every size.
How long does it take? It depends on the size and your speed, so count it. The receiving size in worsted is about 7,000 stitches: 82 in each of 73 rows, plus 1,020 in the three border rounds. Crochet for 10 minutes, count the stitches you made, and divide: at 100 stitches in 10 minutes, that is about 70 ten-minute sessions, or 12 hours.
Does the ch 2 count as a stitch? In this pattern, yes, as in the video. Some patterns do not count it. In those, you work the first hdc into the first stitch and the last hdc into the last stitch, not into the ch 2. Either way works; mixing the two in one blanket is what makes the edges uneven.
Can I use chunky yarn? Yes. The chunky table in step 2 uses the gauge a yarn maker published for its own chunky baby blanket: 9 stitches and 8 rows to 4 inches on an 8 mm hook. Chunky blankets are quicker and heavier.
Can I add stripes? Yes. Change colour exactly as you join a new skein (step 7), at the end of a row. Our baby blanket colour combinations guide helps you pick colours that still show up in a black-and-white photo.
What yarn is best for a baby blanket? Soft, machine-washable acrylic is the usual choice for a gift. Our guide to the best yarn for baby blankets compares the options, and cotton vs acrylic vs bamboo goes into the fibres.
Video credit: Amanda Crochets, “Easy Half Double Crochet Blanket | Easy Crochet Blanket Tutorial”, 2021. The rows follow the video. The sizes, the stitch counts, the yarn amounts and the border are our own arithmetic. Crochet terms are in US English.