Easy Crochet Baby Hat for Beginners: Free Pattern in 5 Sizes, Preemie to 12 Months
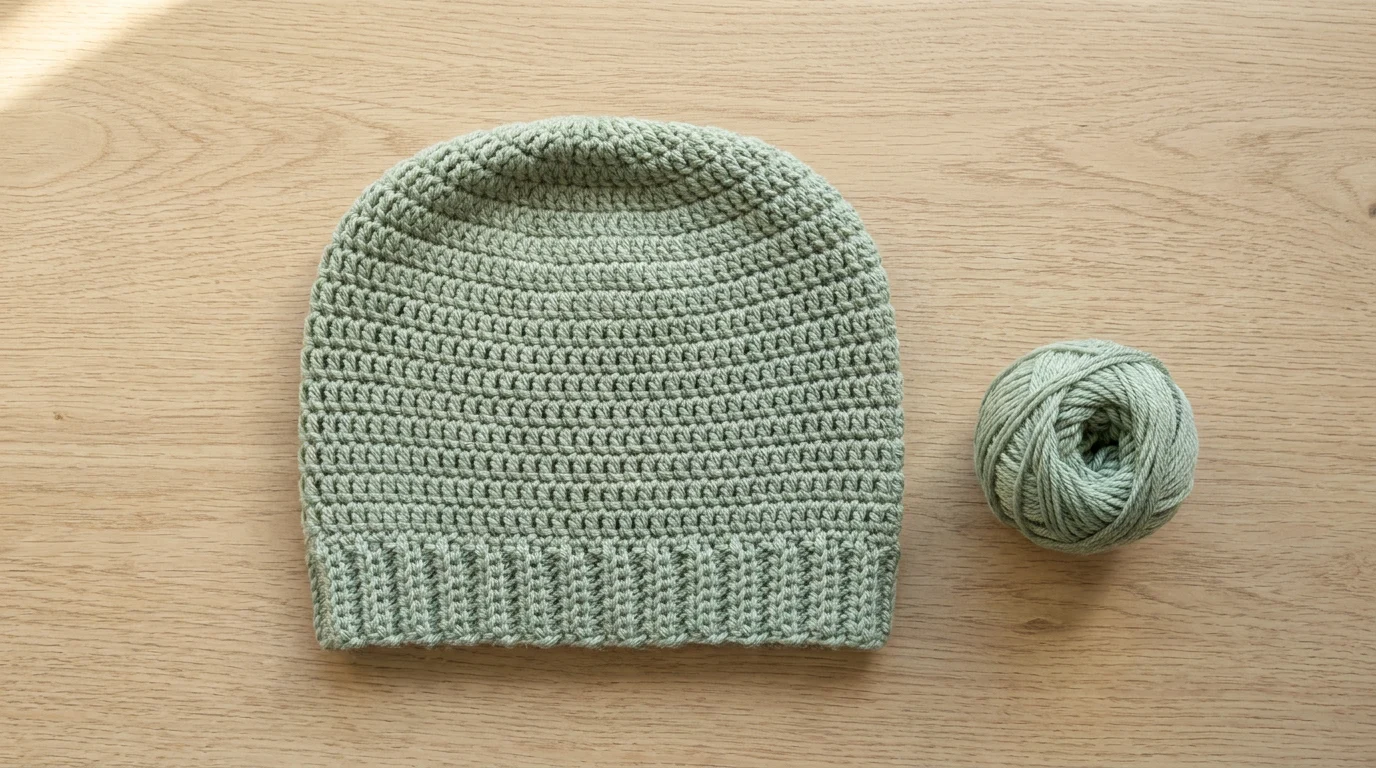
Put 8 half double crochet into a small ring, add 8 stitches every round until the top of the hat is as wide as your size needs, then work plain rounds down to the right height and finish with 3 rounds of ribbing. That is the whole hat. The rest of this page is the numbers: the stitch count after every round, the round where your size stops growing, and one measurement that tells you the hat will fit before you have made the sides.
For a newborn in worsted yarn on a 5.5 mm hook: 6 rounds to reach 44 stitches, about 8 plain rounds, a 3-round brim, and about 75 yards of yarn. The finished hat is about 12½ inches around, 1 inch smaller than a newborn’s head, so it stretches on and stays on.
Download the free printable PDF: every size and gauge table, all 11 steps with their diagrams, and the width check, ready to print. No sign-up.
This hat has not yet been test-made from this page. That is why every round has a stitch count and why the width check comes after only 2 plain rounds: if something is off, you find out while there is very little to undo.
The hat at a glance
| What | This hat |
|---|---|
| Sizes | Preemie, newborn, 0–3 months, 3–6 months, 6–12 months |
| Stitches | Chain, half double crochet, slip stitch, and two post stitches for the brim |
| Yarn | Worsted (#4), machine-washable, 50 to 125 yards depending on size |
| Hook | 5.5 mm (I-9) |
| Gauge | 14 hdc and 12 rounds to 4 in (10 cm) |
| Construction | Joined rounds from the top down: the flat top, plain sides, a ribbed brim. No seams, no turning |
| Skill level | A second project. If you can chain and work a half double crochet, this page teaches the rest |
Why the top decides the size
The top of the hat is a flat circle that grows by 8 stitches every round. When you stop adding stitches, you have fixed the hat’s size: every round after that has the same number of stitches, so the hat is as big around as that last increase round. That is why this pattern tells you which round to stop on for your size, and why the one measurement that matters comes right after it.
A hat should be 1 to 2 inches smaller around than the head. We aim for 1 inch, the gentle end of that range, because half double crochet gives less than a knitted fabric. The ribbed brim adds the stretch that holds it on. Our baby hat size chart explains this negative ease and where the head sizes come from.
Pick your size
| Size | Head | Hat around, aim for | Lay-flat width | Height | Yarn, about |
|---|---|---|---|---|---|
| Preemie | 10–12 in (25–30 cm) | 10 in (25.5 cm) | 4½–5½ in (11.5–14 cm) | 4½ in (11.5 cm) | 50 yd |
| Newborn | 13–14 in (33–36 cm) | 12½ in (32 cm) | 6–6½ in (15–16.5 cm) | 5½ in (14 cm) | 75 yd |
| 0–3 months | 14–16 in (36–41 cm) | 14 in (35.5 cm) | 6½–7½ in (16.5–19 cm) | 6 in (15 cm) | 90 yd |
| 3–6 months | 15–17 in (38–43 cm) | 15 in (38 cm) | 7–7¾ in (18–19.5 cm) | 6½ in (16.5 cm) | 105 yd |
| 6–12 months | 17–18 in (43–46 cm) | 16½ in (42 cm) | 8–8½ in (20.5–21.5 cm) | 7 in (18 cm) | 125 yd |
Lay-flat width is the hat flattened on a table, measured straight across. It is half the hat’s circumference, and it is the check in step 8. Height is from the top of the hat to the edge of the brim.
Making it as a gift and you do not know the baby’s head? Make the 3–6 month size. A newborn hat fits for a few weeks, and a hat that is a little big now will fit soon.
Preemie hats for a hospital: most NICU programmes publish their own rules on size, fibre and trims, and those come first. Ask before you start. The size chart’s preemie section lists the usual rules.
What you need
Every tool our patterns use is on the Crochet essentials page.
- Worsted (#4) yarn, soft and machine-washable: 50 to 125 yards, from the size table. One 364-yard skein, like the one in our baby blanket pattern, makes two hats in the biggest size or seven preemie hats. Leftovers from the blanket are enough for a matching hat.
- A 5.5 mm (I-9) crochet hook. That is one size smaller than our blanket’s 6 mm, because a hat needs a firmer fabric than a blanket. The hook size chart gives the letters.
- 2 locking stitch markers, or short pieces of a different-coloured yarn. One marks the first stitch of each round.
- A tape measure.
- A blunt tapestry needle for weaving in the ends, and scissors.
Abbreviations
US crochet terms throughout. The UK name is in brackets.
- ch: chain.
- hdc: half double crochet (UK: half treble, htr). Yarn over, put the hook into the stitch, yarn over and pull up a loop (3 loops on the hook), yarn over and pull through all 3.
- sl st: slip stitch. Put the hook into the stitch, yarn over and pull through the stitch and the loop on the hook.
- st, sts: stitch, stitches.
- inc: increase. 2 hdc in the same stitch.
- fphdc: front post half double crochet. Yarn over, push the hook in from the front, behind the upright body of the next stitch (its post) and out to the front again. Yarn over and pull up a loop, then yarn over and pull through all 3 loops. The stitch sits forward.
- bphdc: back post half double crochet. The same, from the back: the hook goes in from the back, in front of the post and out to the back again. The stitch sits back.
How every round starts and ends: ch 2, which does not count as a stitch. Work the round. Then sl st into the top of the first hdc of the round, not into the ch 2. Never turn: the same side faces you all the way. A marker in the first hdc of each round shows you where to join.
Gauge, and which column is yours
Our numbers are for 14 hdc and 12 rounds to 4 inches. That is the gauge Lion Brand gives for plain half double crochet in two of its worsted blanket patterns, one of them on this hook. Your hands may be looser or tighter, and the table below has a column for each. Find your gauge in step 1, then use your column for the rest of the pattern.
| Size | 12 hdc in 4 in | 14 hdc in 4 in (ours) | 16 hdc in 4 in |
|---|---|---|---|
| Preemie | 28 sts, round 4 | 36 sts, round 5 | 40 sts, round 5 |
| Newborn | 36 sts, round 5 | 44 sts, round 6 | 48 sts, round 6 |
| 0–3 months | 40 sts, round 5 | 48 sts, round 6 | 56 sts, round 7 |
| 3–6 months | 44 sts, round 6 | 52 sts, round 7 | 60 sts, round 8 |
| 6–12 months | 48 sts, round 6 | 56 sts, round 7 | 64 sts, round 8 |
The cell is your last increase round: the stitch count the hat keeps from there on, and the round where you reach it.
A gauge that is not in the table: stitches = the “aim for” size × your stitches in 4 inches ÷ 4, rounded to the nearest multiple of 4. Then grow the top to that count with the rounds in steps 3 to 6.
The pattern
1. Check your gauge
Chain 18. Work 1 hdc into the 3rd chain from the hook and 1 hdc into each chain to the end. [16 sts] Ch 2 and turn, then work 1 hdc into each stitch. [16 sts] Repeat that row until you have 8 rows. Lay the swatch flat and count the stitches in 4 inches across the middle, halves included.
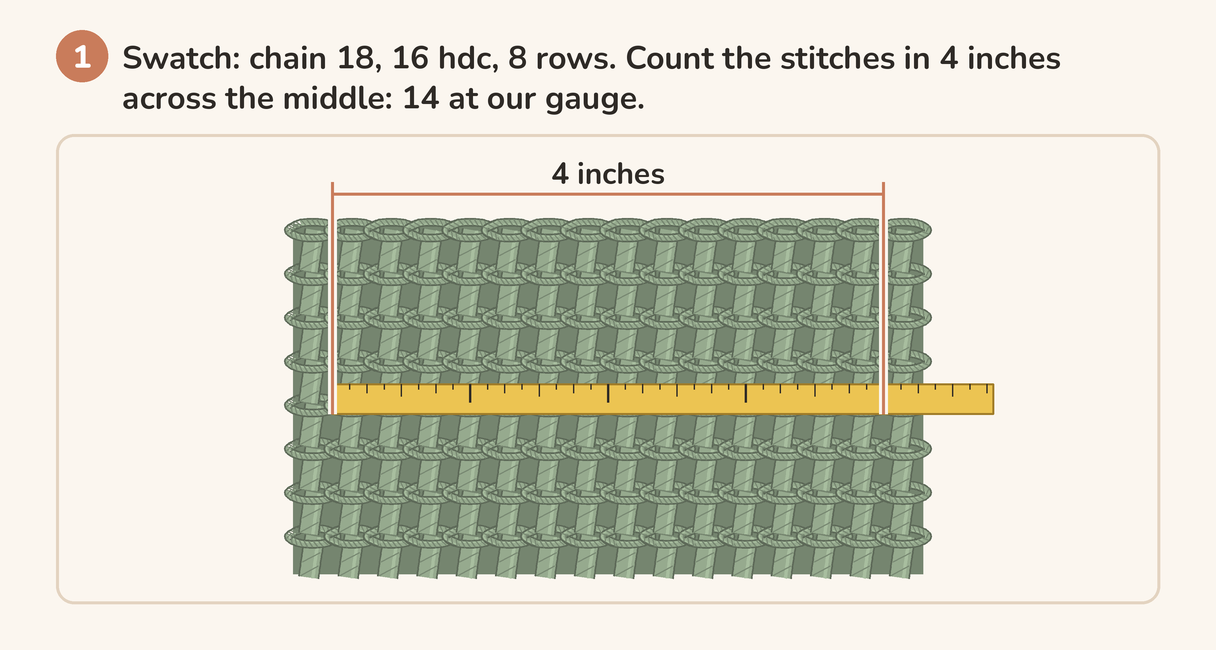
Pick the column in the gauge table that is closest to your count. At 13 to 15 stitches, use ours. If you would rather start the hat straight away, use our column: the width check in step 8 catches a gauge that does not match, at the cost of undoing a few rounds.
2. Make the ring
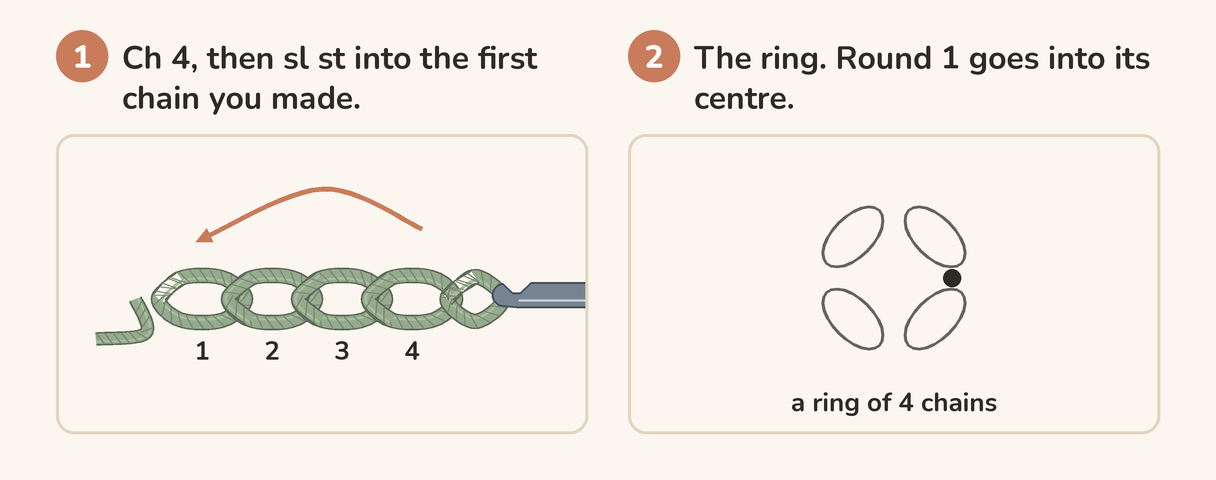
Make a slip knot and ch 4. Sl st into the first chain you made, the one furthest from the hook, to close the chains into a ring. Leave a tail of about 6 inches.
3. Round 1
Ch 2. Work 8 hdc into the centre of the ring, around the chains, not into them. Sl st into the top of the first hdc to join. Put a marker into that first hdc. [8 sts]
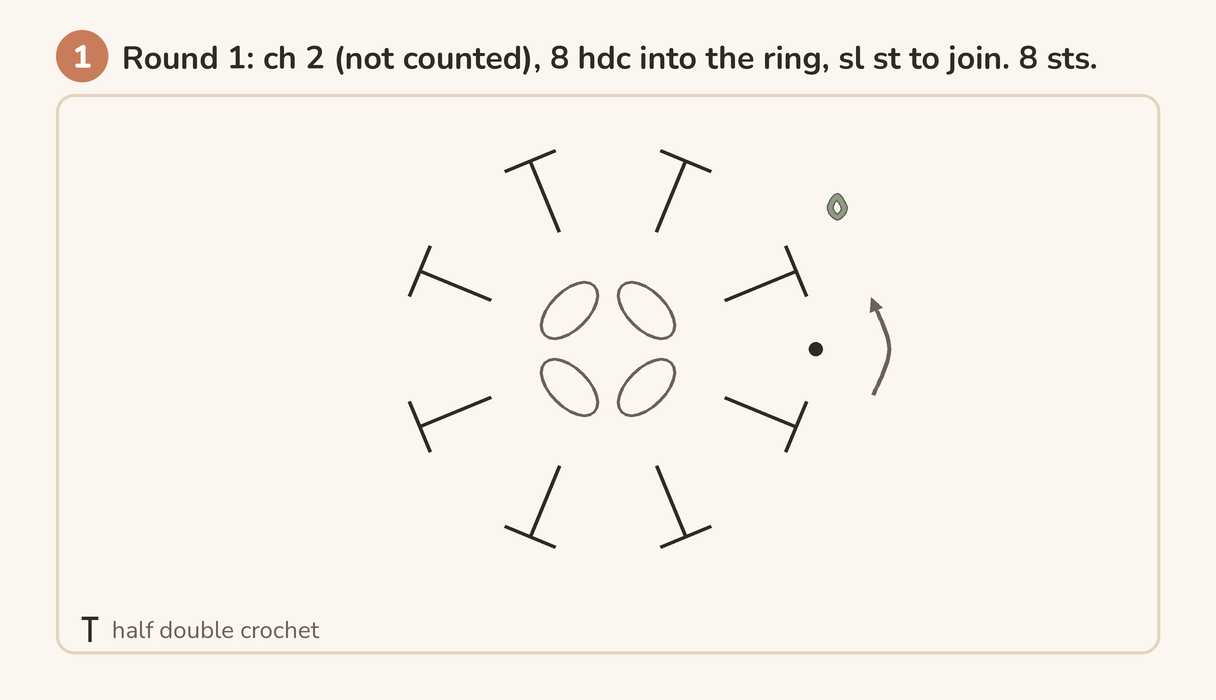
Hold the tail along the ring as you work and the hdc cover it. Pulling the tail later closes the hole at the top.
4. Round 2
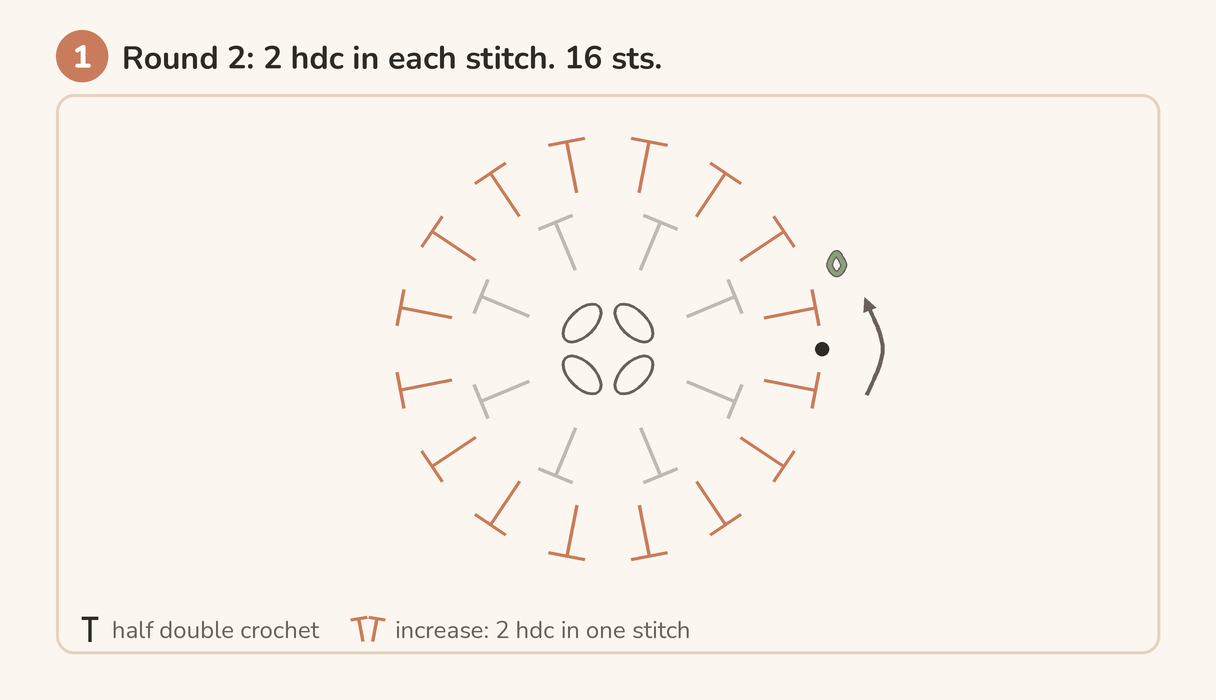
Ch 2. Work 2 hdc into each stitch around. Join with a sl st into the first hdc and move the marker up into it. [16 sts]
5. Round 3
Ch 2. (2 hdc in the next stitch, 1 hdc in the next stitch) 8 times. Join and move the marker up. [24 sts]
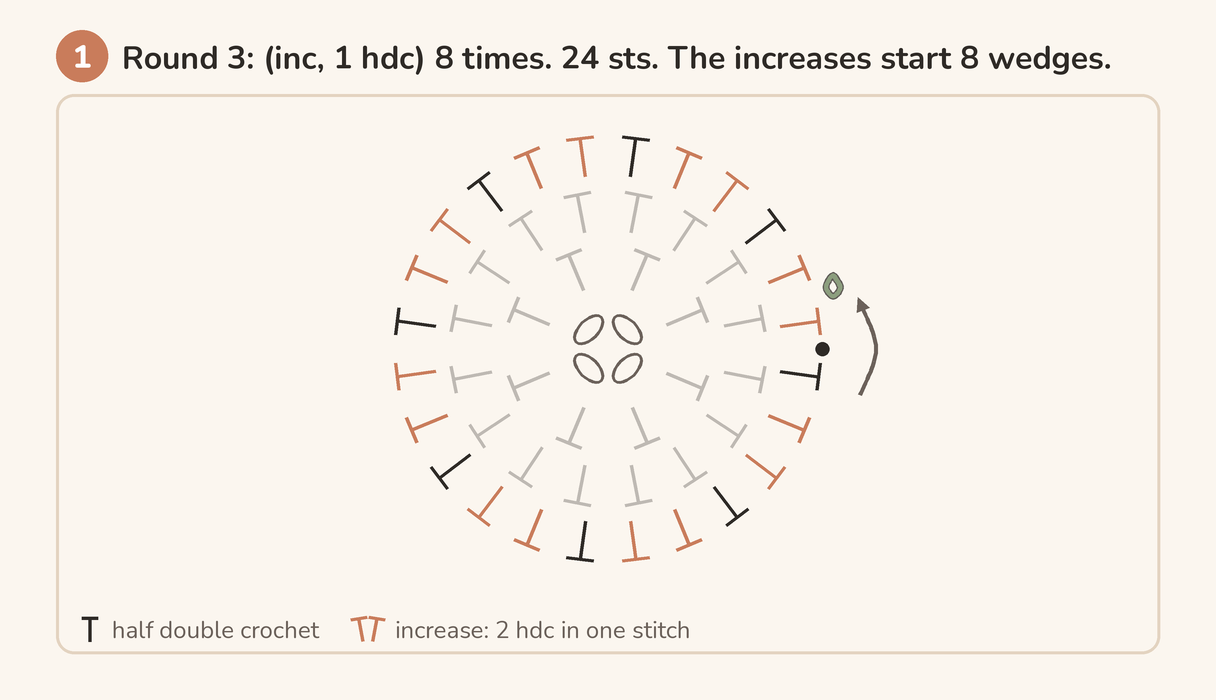
From here on, the 2 hdc of each increase go into the first stitch of each repeat. The increases stack on top of each other and the top of the hat grows as 8 wedges.
6. Round 4 and on: one more plain stitch each round
Each round puts one more plain hdc between the increases than the round before. Work the rounds in this table in order, and stop after the round in your column of the gauge table.
| Round | Work | Stitches |
|---|---|---|
| 1 | 8 hdc in the ring | 8 |
| 2 | 2 hdc in each stitch | 16 |
| 3 | (2 hdc in the next stitch, 1 hdc in the next stitch) 8 times | 24 |
| 4 | (2 hdc in the next stitch, 1 hdc in each of the next 2 stitches) 8 times | 32 |
| 5 | (2 hdc in the next stitch, 1 hdc in each of the next 3 stitches) 8 times | 40 |
| 6 | (2 hdc in the next stitch, 1 hdc in each of the next 4 stitches) 8 times | 48 |
| 7 | (2 hdc in the next stitch, 1 hdc in each of the next 5 stitches) 8 times | 56 |
| 8 | (2 hdc in the next stitch, 1 hdc in each of the next 6 stitches) 8 times | 64 |
Round 4 is [32 sts], round 5 is [40 sts], and each round after that adds 8.
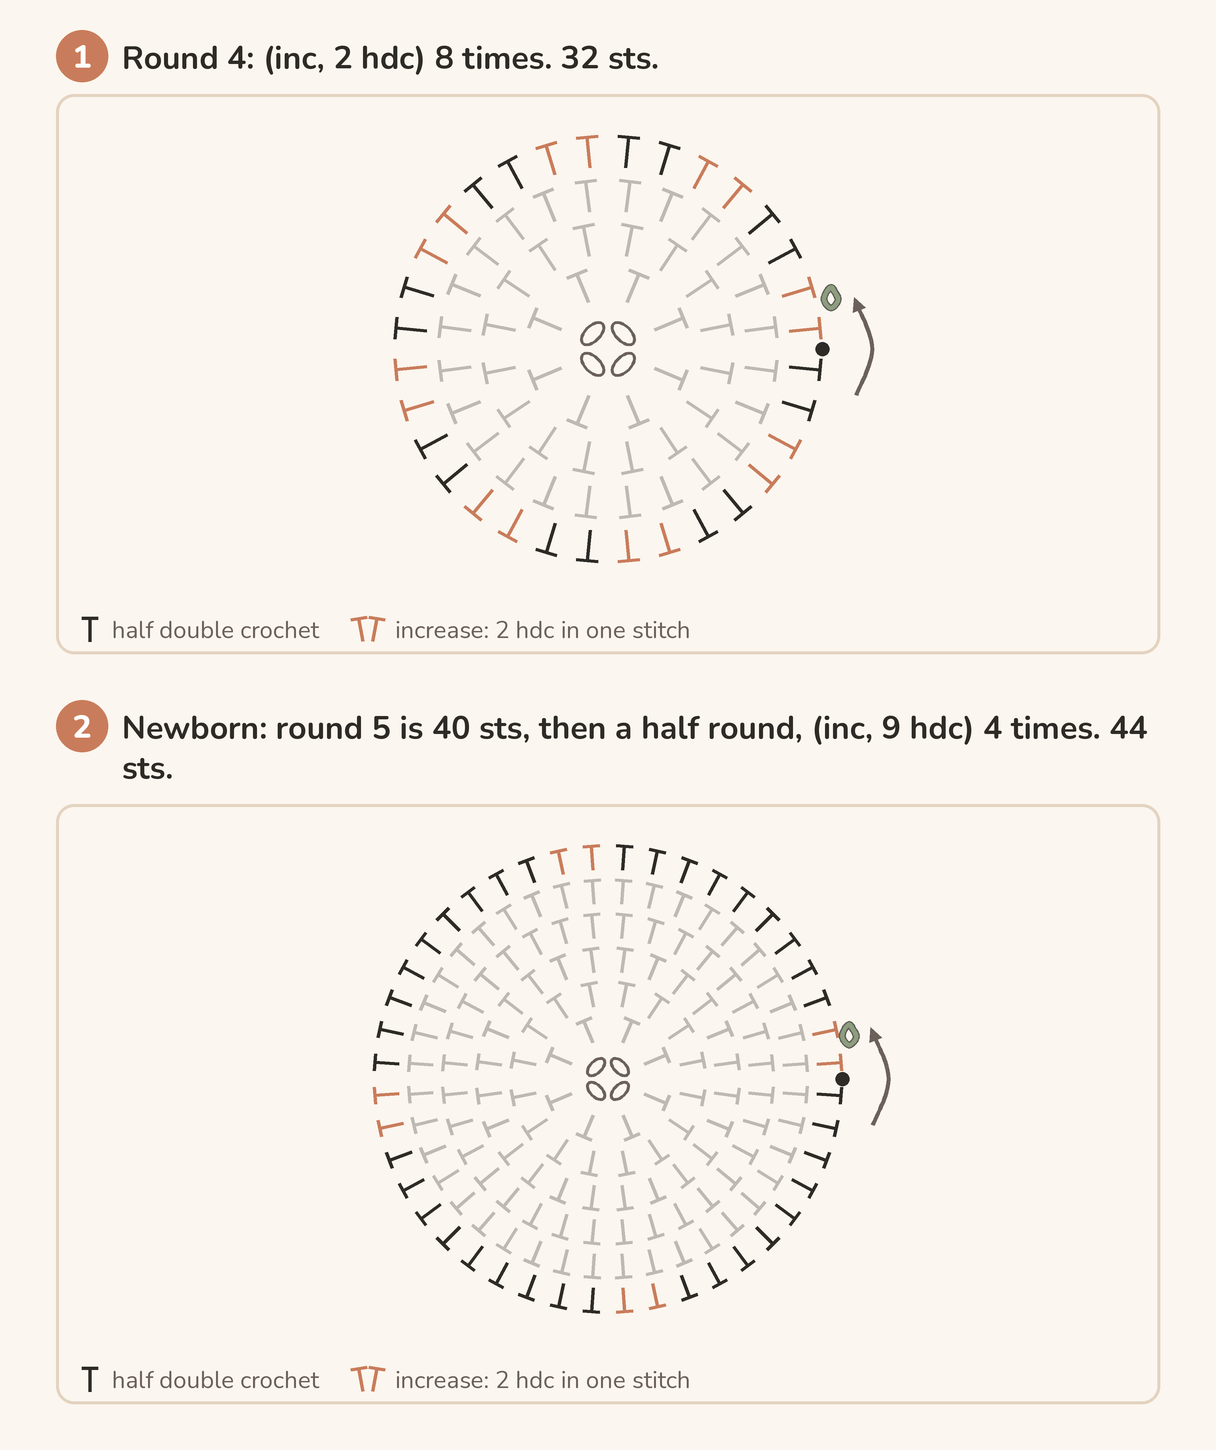
A half round. If your number ends in 4 (28, 36, 44, 52 or 60), your last increase round adds 4 stitches instead of 8. Work it right after the full round below your number:
| After a round of | Half round: work this 4 times | Stitches |
|---|---|---|
| 24 | 2 hdc in the next stitch, 1 hdc in each of the next 5 stitches | 28 |
| 32 | 2 hdc in the next stitch, 1 hdc in each of the next 7 stitches | 36 |
| 40 | 2 hdc in the next stitch, 1 hdc in each of the next 9 stitches | 44 |
| 48 | 2 hdc in the next stitch, 1 hdc in each of the next 11 stitches | 52 |
| 56 | 2 hdc in the next stitch, 1 hdc in each of the next 13 stitches | 60 |
Our newborn hat is round 5 at [40 sts], then the half round after 40: (2 hdc in the next stitch, 1 hdc in each of the next 9 stitches) 4 times. [44 sts]
7. Check the top after every round
Two checks, each a few seconds:
- Count the stitches. The round must have the number in the table. Counting is easier in wedges: each wedge starts with an increase.
- Look at the shape. Laid on the table, the top lies flat or curves into a shallow dome. That is right.
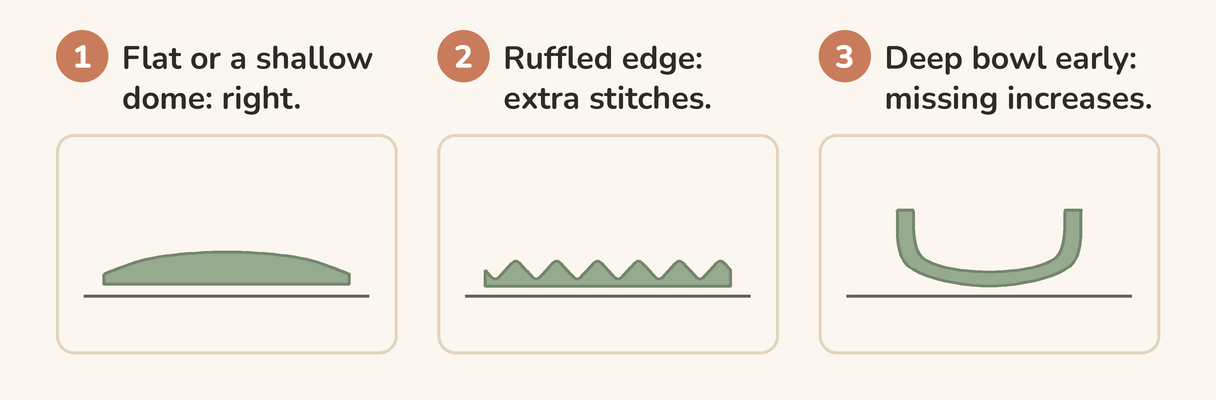
If the edge ruffles like a frill, the round has extra stitches; if the top cups into a deep bowl before round 4, it is short of increases. Either way, count again and undo back to the last round that had the right number. A wrong count fixed now costs one round. Found at the end, it costs the hat.
8. The sides, and the width check
Ch 2. Work 1 hdc into each stitch around, with no increases. Join and move the marker up. Every plain round keeps your last increase number: [44 sts in every round] for our newborn hat.
After 2 plain rounds, stop and lay the hat flat on a table with the join at one side. Measure straight across, without stretching it. The width must be in the “lay-flat width” range for your size (6 to 6½ inches for a newborn).
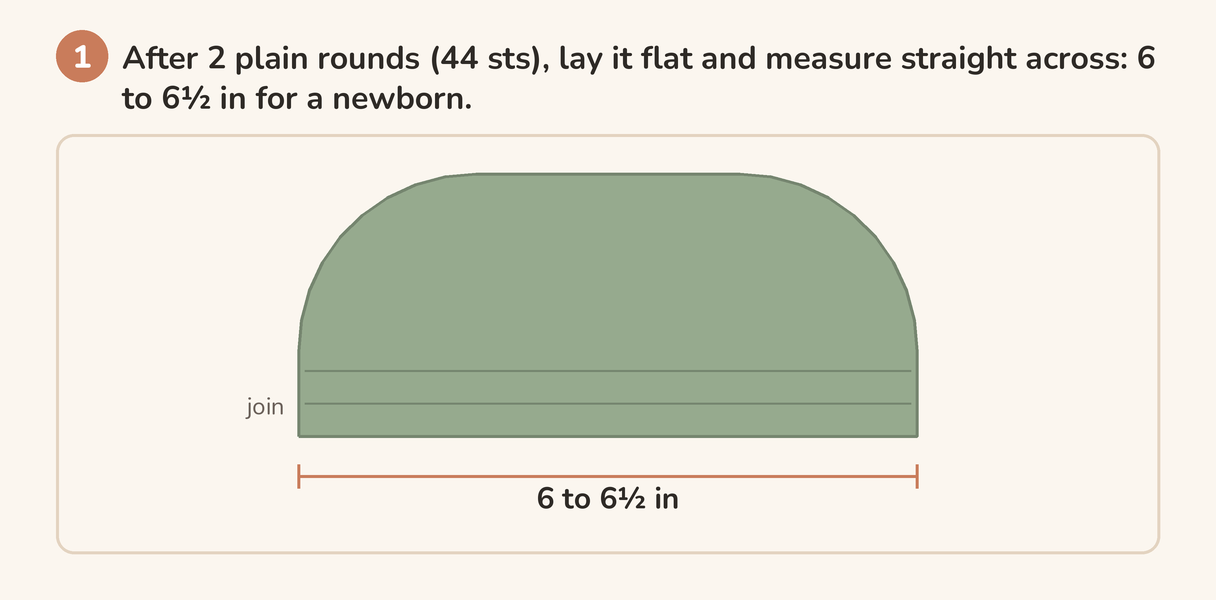
- Wider than the range: your number goes down by 4. At our gauge, 4 stitches is about ½ inch of lay-flat width.
- Narrower than the range: your number goes up by 4.
- For either one, undo rounds until the hat has fewer stitches than the new number, then work the rounds from step 6 that reach it. Our newborn at 48 instead of 44: undo round 6, then work the half round after 40.
- In the range: the hat will fit. Carry on.
9. Work down to the height
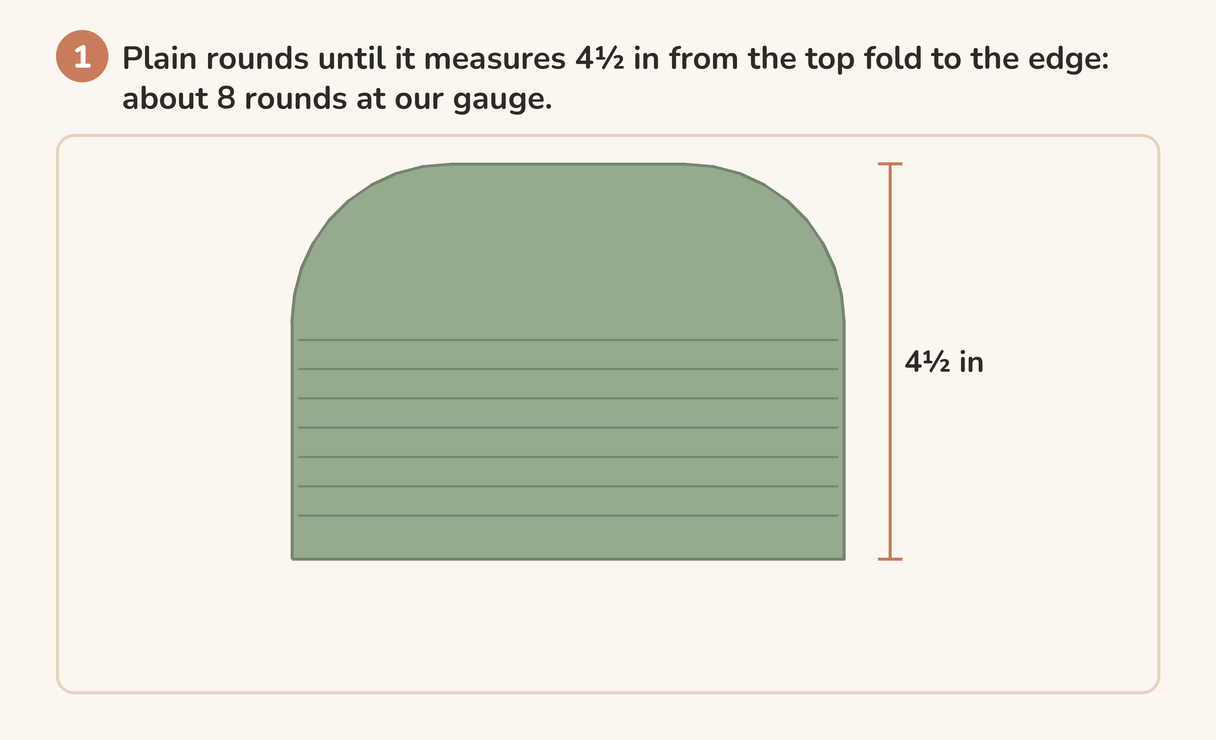
Keep working plain rounds. When the hat measures the height in this table from the top to the edge, stop: the 3 brim rounds add about 1 inch more.
| Size | Last increase round | Plain rounds, about | Brim rounds | Measure before the brim |
|---|---|---|---|---|
| Preemie | 5 (36 sts) | 6 | 3 | 3½ in (9 cm) |
| Newborn | 6 (44 sts) | 8 | 3 | 4½ in (11.5 cm) |
| 0–3 months | 6 (48 sts) | 9 | 3 | 5 in (12.5 cm) |
| 3–6 months | 7 (52 sts) | 10 | 3 | 5½ in (14 cm) |
| 6–12 months | 7 (56 sts) | 11 | 3 | 6 in (15 cm) |
The plain round counts are for our gauge. Go by the tape measure, not the count: lay the hat flat and measure from the middle of the top fold down to the last round.
10. The ribbed brim
Brim round 1: ch 2. (1 fphdc around the next stitch, 1 bphdc around the next stitch) all the way round. Join with a sl st into the top of the first fphdc. [44 sts]
Brim rounds 2 and 3: ch 2. Work 1 fphdc around each stitch that sits forward and 1 bphdc around each stitch that sits back. Join. [44 sts]
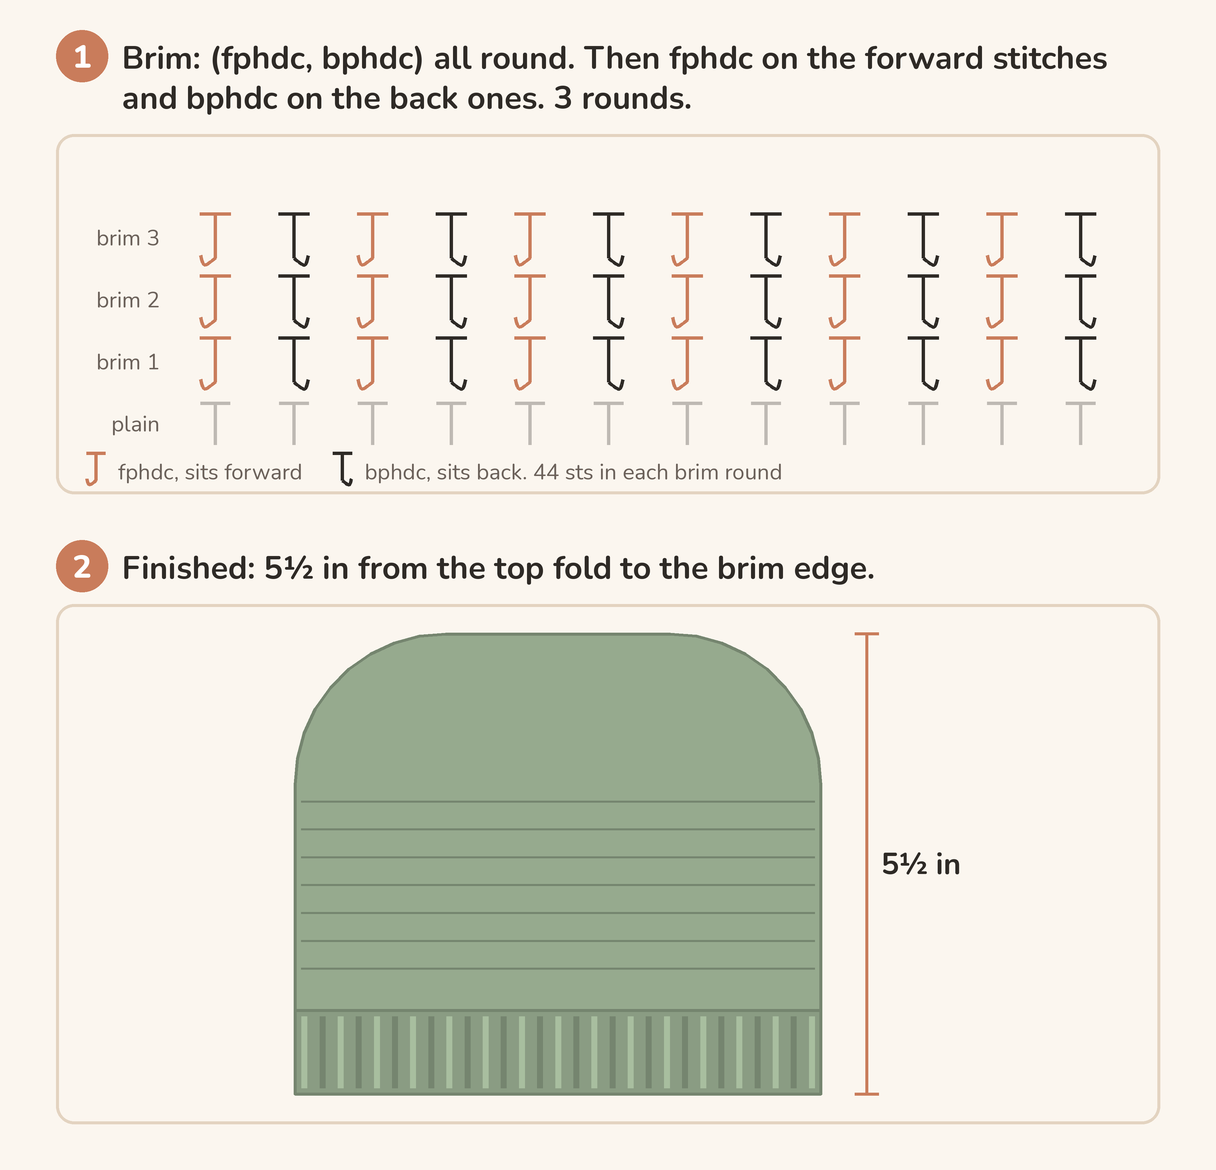
Every stitch count in this pattern is a multiple of 4, so the forward and back stitches always pair up. The ribs line up in columns because each one is worked around the same kind of stitch below it. Ribbing stretches more than plain half double crochet, and it is the part that holds the hat on.
11. Finish
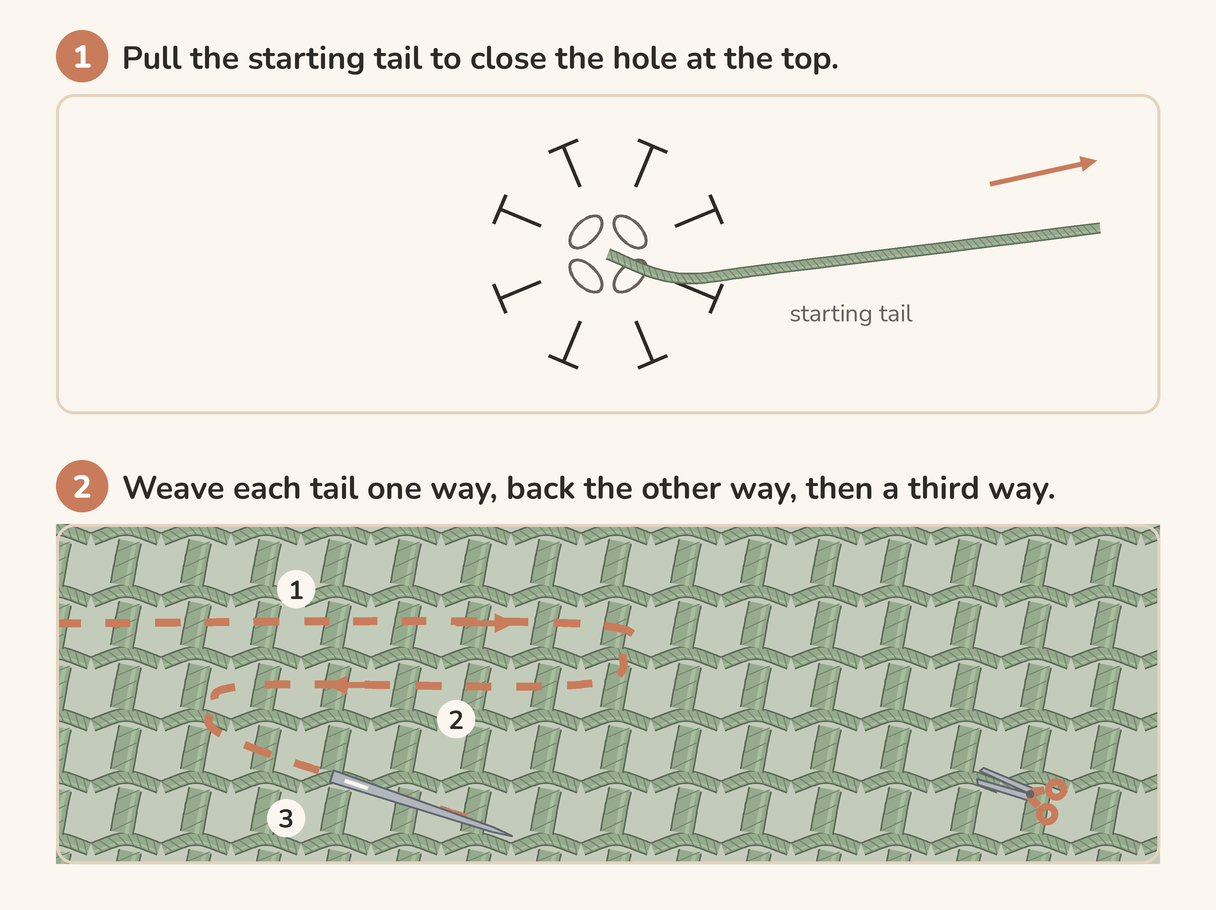
Cut the yarn, leaving 6 inches, and pull the end through the loop on the hook. Thread it on the tapestry needle and weave it into the brim: one way, back the other way, then a third way. Pull the starting tail at the top until the hole closes, then weave it in the same way.
Lay the finished hat flat. It should be in the lay-flat width range for your size and about the height in the size table.
If something goes wrong
The top ruffles. There are more stitches than the round should have, usually an extra increase. Count the round against the table and undo back to the last round that was right.
The top is turning into a cone. Increases are missing. Count each round, wedge by wedge: every wedge starts with 2 hdc in one stitch.
The width check is out by more than 1 inch. Your gauge is far from your column. Measure the swatch again (step 1) and use the column that matches, or the formula under the gauge table.
The joins make a slanted line. That is normal in joined rounds. Wear that side at the back.
There is a hole at the top. Pull the starting tail firmly before you weave it in. The ring of 4 chains closes up around it.
The brim flips outward. Check that brim rounds 2 and 3 put fphdc on the forward stitches and bphdc on the back ones. Swapping them halfway round breaks the ribs.
Frequently asked questions
What size crochet hat for a newborn? About 12½ inches around and 5½ inches tall, for a head of 13 to 14 inches. In this pattern that is 44 stitches at our gauge. The baby hat size chart has every age up to 3 years.
How long does it take? Count it. The newborn hat is 648 stitches: 164 in the 6 increase rounds, 352 in 8 plain rounds, and 132 in the brim. At 100 stitches in 10 minutes that is about 65 minutes. Time yourself for 10 minutes for your own number.
Can I use DK yarn? Yes, with a smaller hook, about 4 mm (G-6). DK makes more stitches in 4 inches, so make the swatch in step 1 and use the 16-stitch column or the formula. The hat takes more rounds to reach the same size.
Can I add a pompom? We leave it off. Many hospital programmes ask for no pompoms on preemie hats, and a pompom that comes loose is a small part a baby can put in its mouth.
How do I make a bigger size? Use the formula under the gauge table with the head size from the baby hat size chart, minus 1 inch. Keep adding 8 stitches a round until you reach your number, then work to the chart’s height.
Should a baby wear it indoors or to sleep? No. The American Academy of Pediatrics advises against hats on babies indoors, except in the first hours after birth or in the NICU, because of the risk of overheating. This hat is for going out.
Sources: head sizes from our baby hat size chart, checked against the WHO head-circumference medians. Gauge from two published Lion Brand worsted blanket patterns in half double crochet. The rounds, stitch counts, heights and yarn amounts are our own arithmetic. Crochet terms are in US English.